Sample Configuration - University Wordpress Theme
See The Documentation for full document
- Created: July 26th 2014
- Latest Update: July 26th 2014
- By: CactusThemes
- http://themeforest.net/user/cactusthemes
- Email: [email protected]
For support please checkout CACTUSTHEME SUPPORT FORUM
University Layout

Configure Home Page
1. HomePage Layout
Make sure you have understood the theme layout

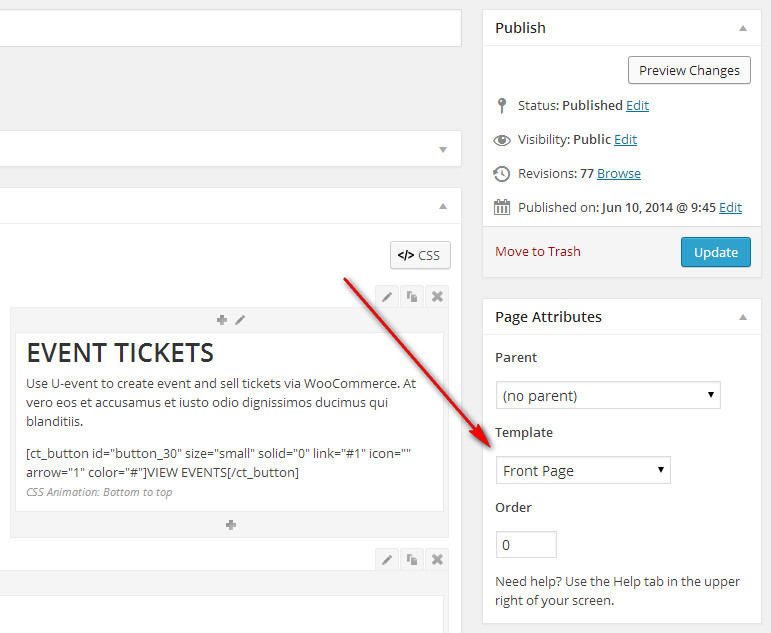
2. Assign a homepage
- Go to Pages > Add New page, set name as “Home”
- Choose Frontpage Template for this page

- In the Layout Settings > Sidebar choose Hidden
- Go to Settings > Reading and under “Front page displays”, click the radio button for A static page. Select “Home” in the first drop down (for Front page)
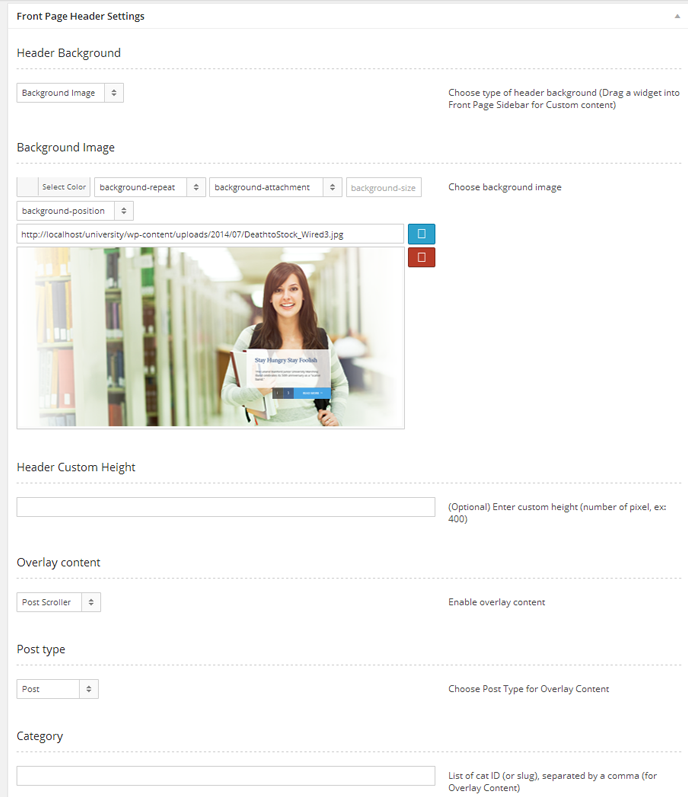
3. Configure Header
Configure Header in Front Page Header Setting box. Choose the attributes as below- Header Background > Background Image: Background will be a static image on Heading
- Background Image: Insert background image
- Overlay content: Choose "Post Scroller"
- Post style Choose "Post"
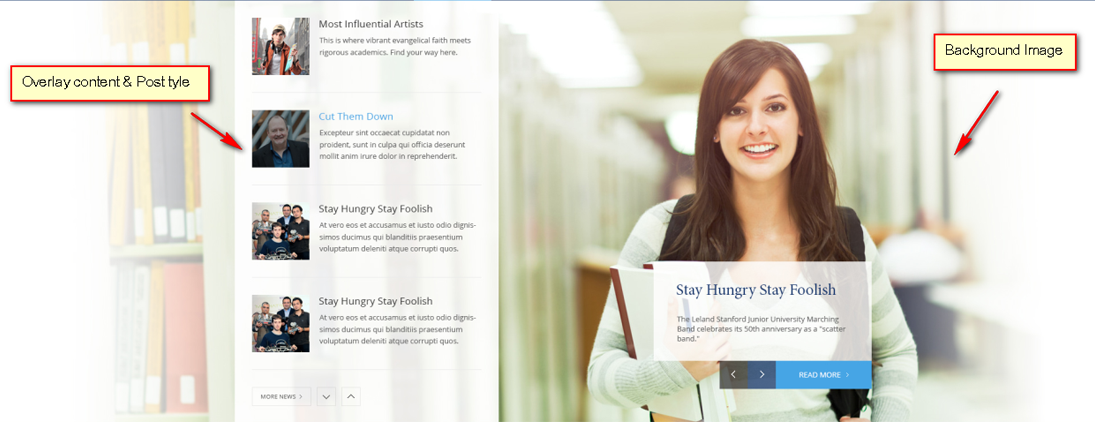
Result
4. Sample Code
Below is sample code for our demo home pages. Change the editor into Classic Editor (Text Mode) and paste the code into the page content. Alternatively, you can ignore this step and go to next one to configure the content yourself5. Add Shortcode Elements
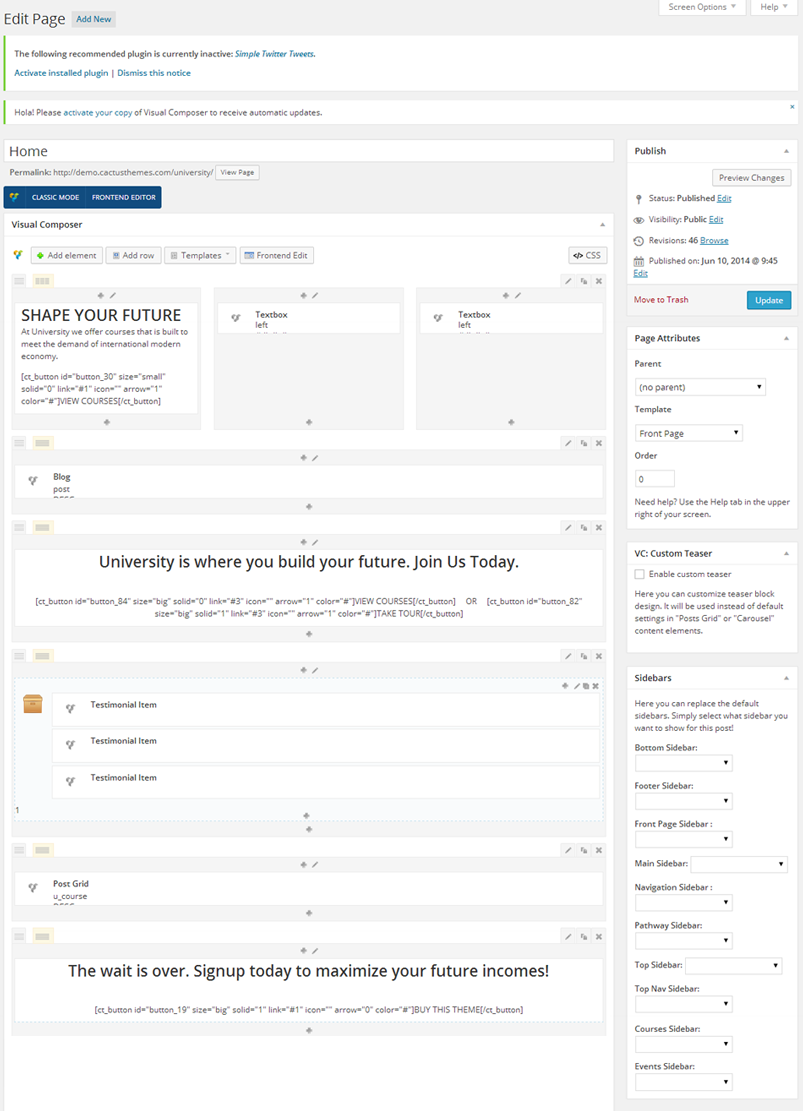
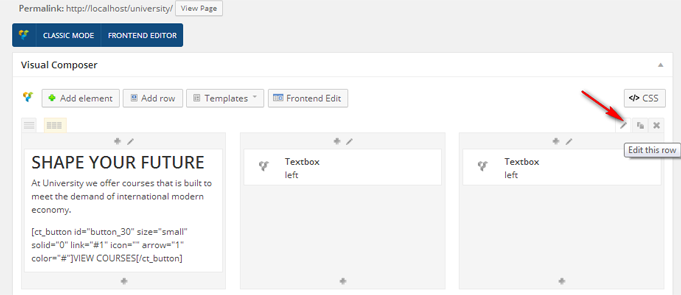
If you do not use sample code in previus step, see this step to understand how we build the homepageSwitch to Backend Editor and click Add Element. The layout of page is built including sections as follows
- The first section: Use "TextBlock" Shortcode & "Textbox" shortcode (See how to use here)
- The second section: Use "Blog" shortcode with option "Post Type" and choose "Post" (In order to display Posts, you need to prepare articles to post on website, go to Posts > Add New).
- The third section: "University is where you build your future" Use "Text Block" short code
- The fourth section: Use "Post Grid" shortcode with option Post Type and choose "Event (In order to display Events, you need to prepare articles for Event, go to U-Event >Add New Event: prepare content for Event see the instruction how to create Event here).
- The fifth section: Use "Testimonial" shortcode (see how to use here)
- The final section: Use "TextBlock" shortcode
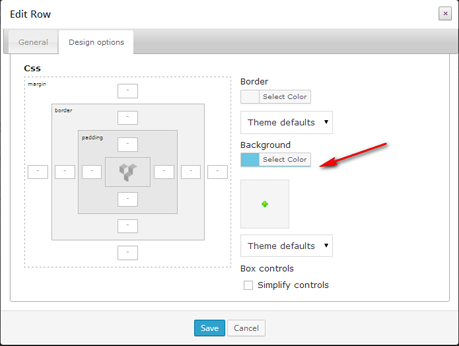
Note: If you would like to insert background image for section of description of the content in "TextBlock" Shortcode & "Textbox" shortcode in section 1, click Edit row > Design options > Background
6. Configure navigation
Go to Appearance > Menus. Create menus for Secondary Menu and Primary Menu. Refer the instruction in Create a menu7. Change Logo
Change your logo, go to Appearance > Theme Options > General > Logo Image and Upload your logo image8. Turn on Search box
Turn the search box on, go to Theme Options > General > Enable Search choose "ON"9. Configure top social icons
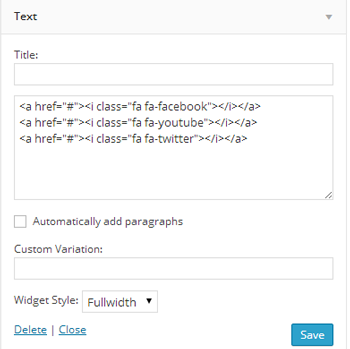
Configure the top social icons, go to Appearance > Widgets drag Widget "Text" name into Top Nav Sidebar and add a code and "Save", for example: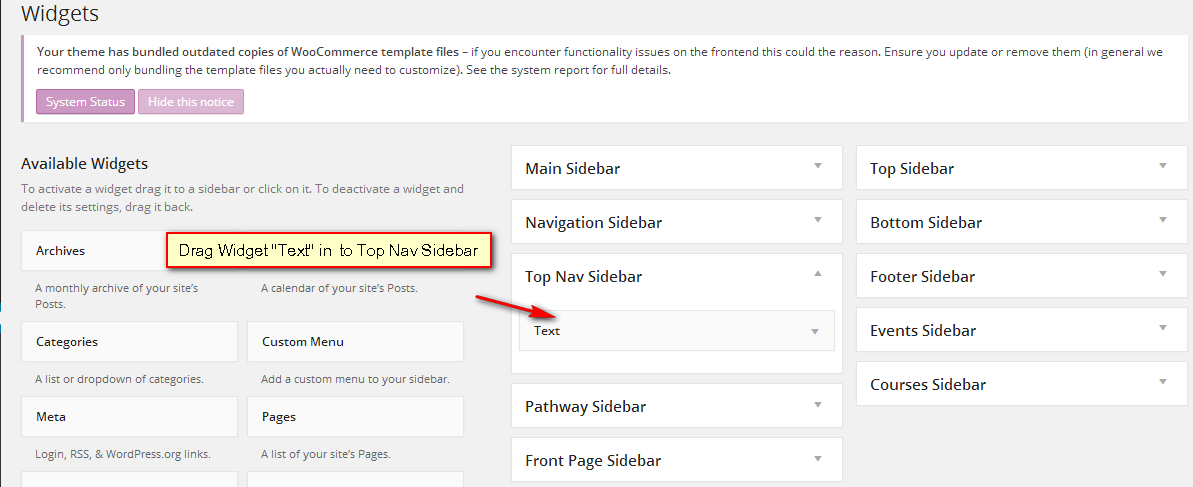
Result

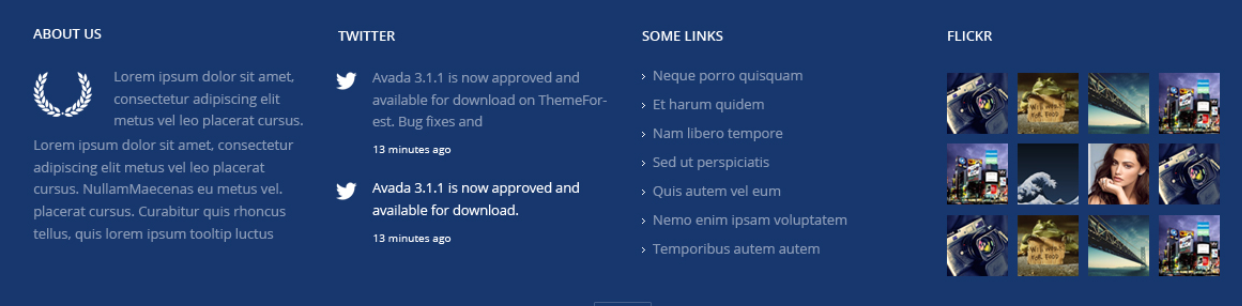
10. Configure footer widgets
Go to Widgets and drag widgets into Footer Sidebar.There are three lines in Footer Sidebar in demo page, the first line uses widget name "Text". For example: For the content
- [textbox icon=" fa-star" heading="Bright Career" layout="left"]Atero voluptatum ptatum eos et accusamus et iusto odio dignissimos ducimus.[/textbox]
- Including
- [textbox] &[/textbox] // End and start tag of textbox
- icon="" // The names of icons using FontAwesome. For example: icon "fa-star" is a symbol with the shape "star"
- heading="" // Enter title of text
- layout="" // The text is aligned right, left or center
- Atero voluptatum ptatum eos et accusamus et iusto odio dignissimos ducimus// Text's content
- Widget width Choose col-md-4
- Widget Style: Choose Fullwidth

Create line crossing word "ENROLL TODAY" using Widget name "U-Divider"

The second line uses Widget name "Custom Menu" with attributes
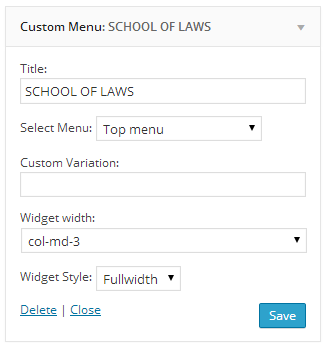
- Title: Enter the title
- Select Menu: Choose a menu(For example: For Top Menu- Please go to Menus to create Top Menu)
- Widget width: Choose Col-md-3
- Widget Style: Choose Fullwidth
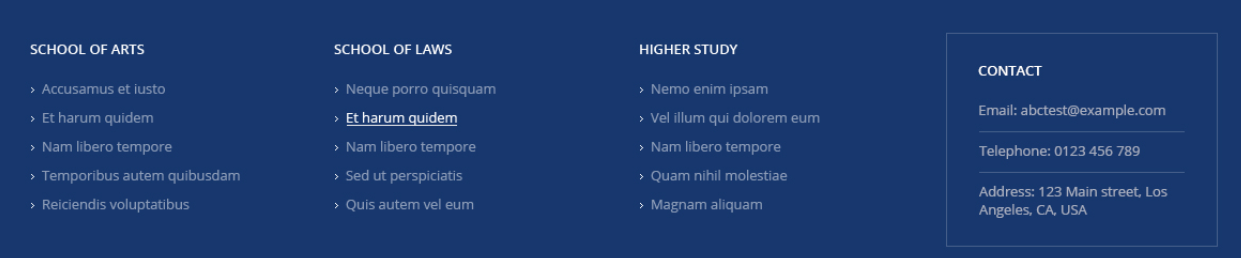
The third line uses Widget name Simple Twitter Tweets, Recent Posts, Flickr Badge (In order to have these widgets, you need to install Flickr Badges Widget plugin and Simple Twitter Tweets plugin)
11. Add social links
Go to Theme Options > Social Accounts and paste your social profile page URL into the textbox
Configure Header With Revolution Slider
- Go to Pages > Add New page
- Choose Frontpage Template for this page
- In the Layout Settings > Sidebar choose Hidden
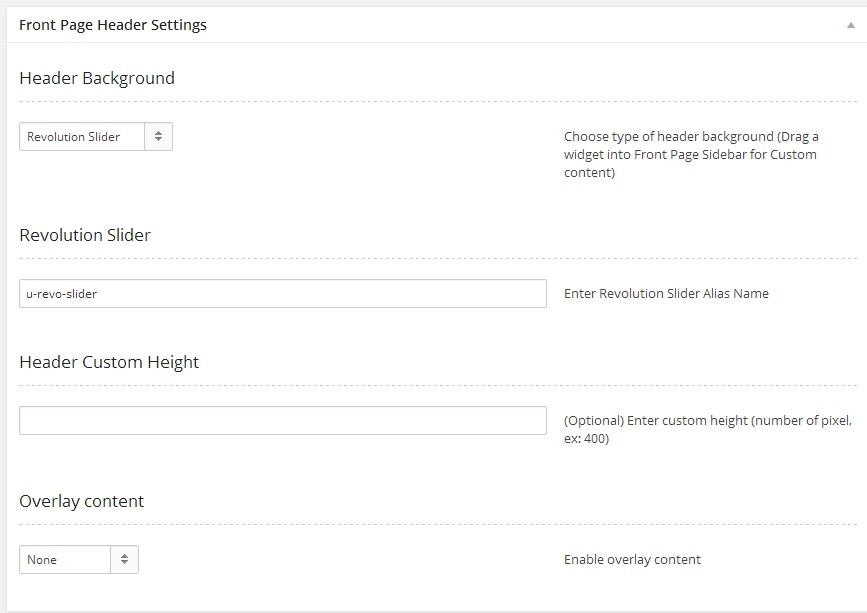
- Configure Header in Front Page Header Setting box. Choose the attributes as below
- Header Background > Revolution Slider: Choose to use Revolution Slider for Header Background. You will need to create a slider in advance
- Revolution Slider: Enter (alias) name of slider here
- Overlay content: Choose None
- Enable University Style for Revolution Slider: Choose "OFF" for Style 1, choose "ON" for Style 2
The result is as our Homepage V2 demo page

Revolution Slider with button
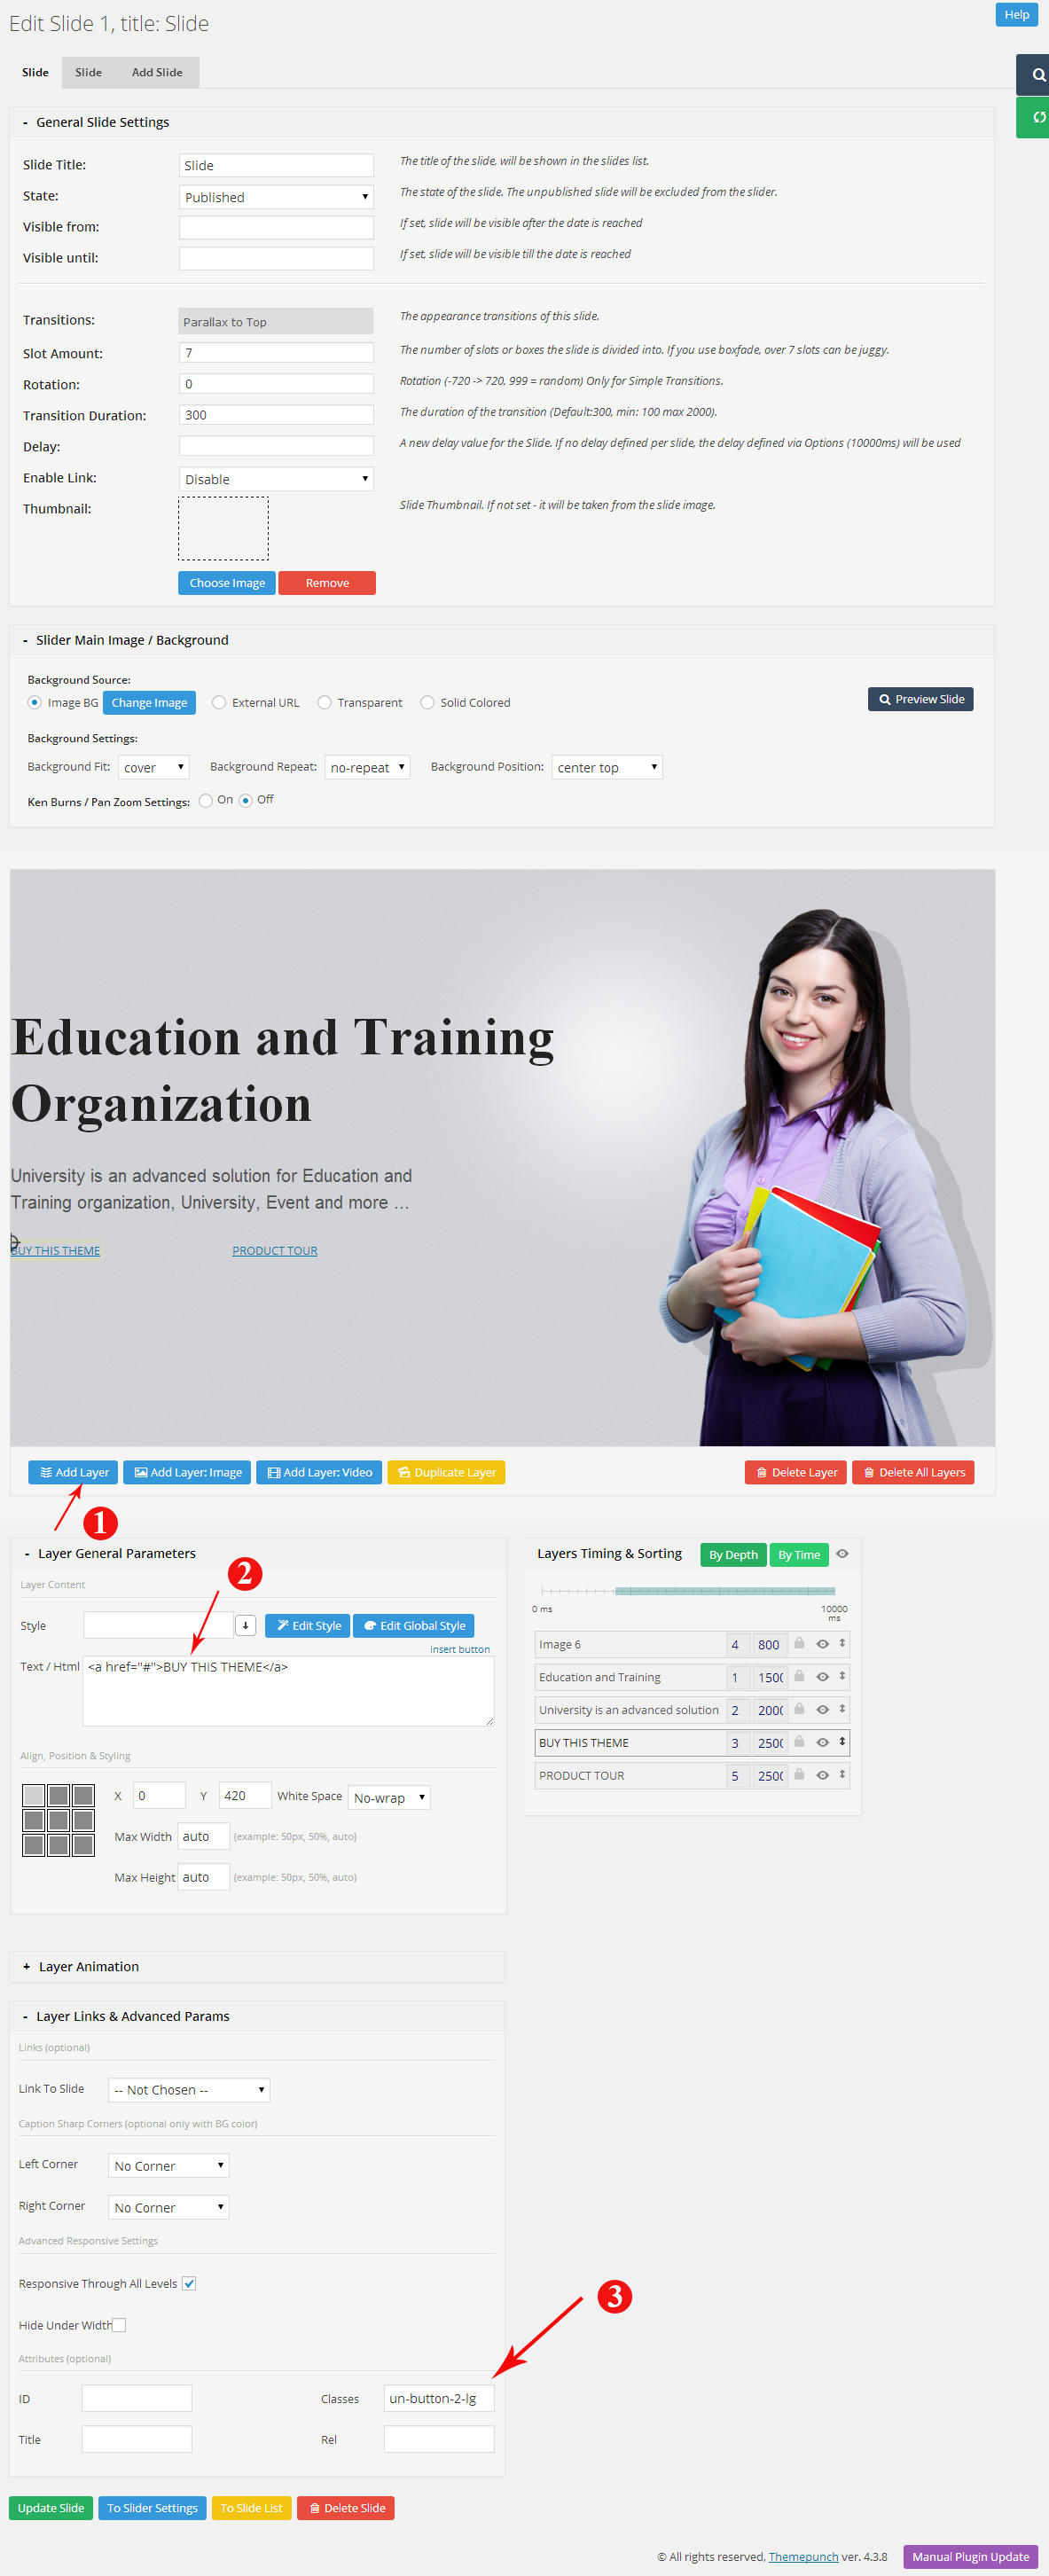
Style 1: (to configure Revolution Slider, see more at here) In order to put buttons into Revolution Slider as the image above, please following these steps
- Step 1: Go to Revolution Slider > Edit Slides > Edit Slide
- Step 2: Click Add Layer
- Step 3: In Text/Html enter code, for example , in which BUY THIS THEME is the name of Button, href is the URL to navigate
- Step 4: In Layer Links & Advanced Params enter button class, for example
- In which: Button class includes
- un-button-1 - Small button with border
- un-button-1-lg - Big button with border
- un-button-2 - Small button with background
- un-button-2-lg - Big button with background nổi
- In which: Button class includes
- Step 5: Save all
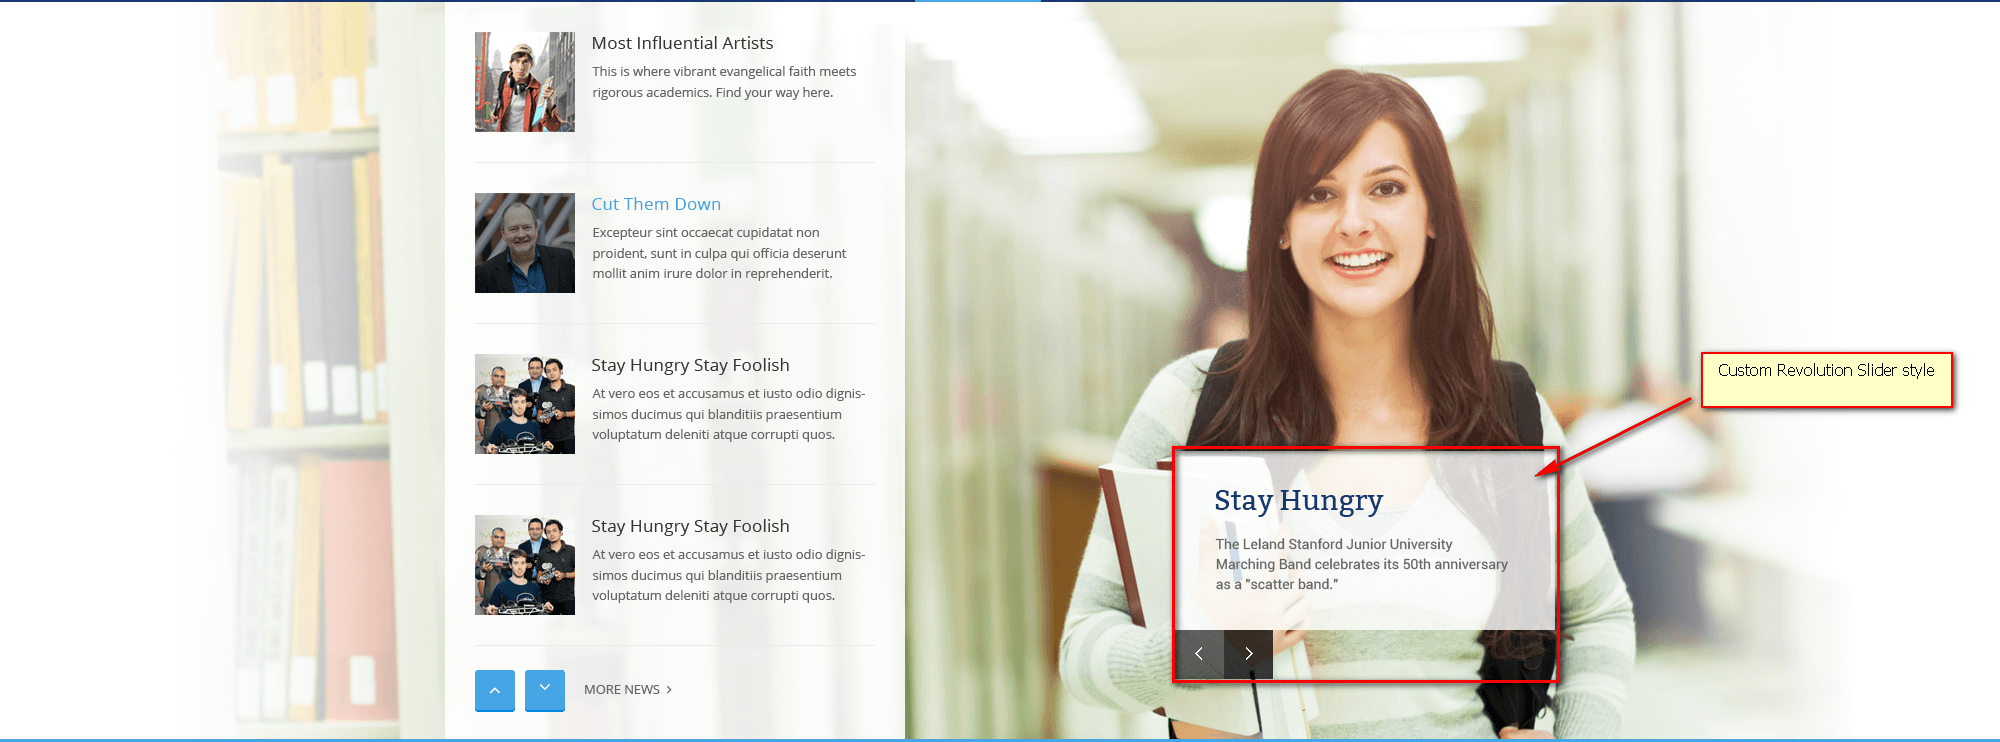
Custom Revolution Slider
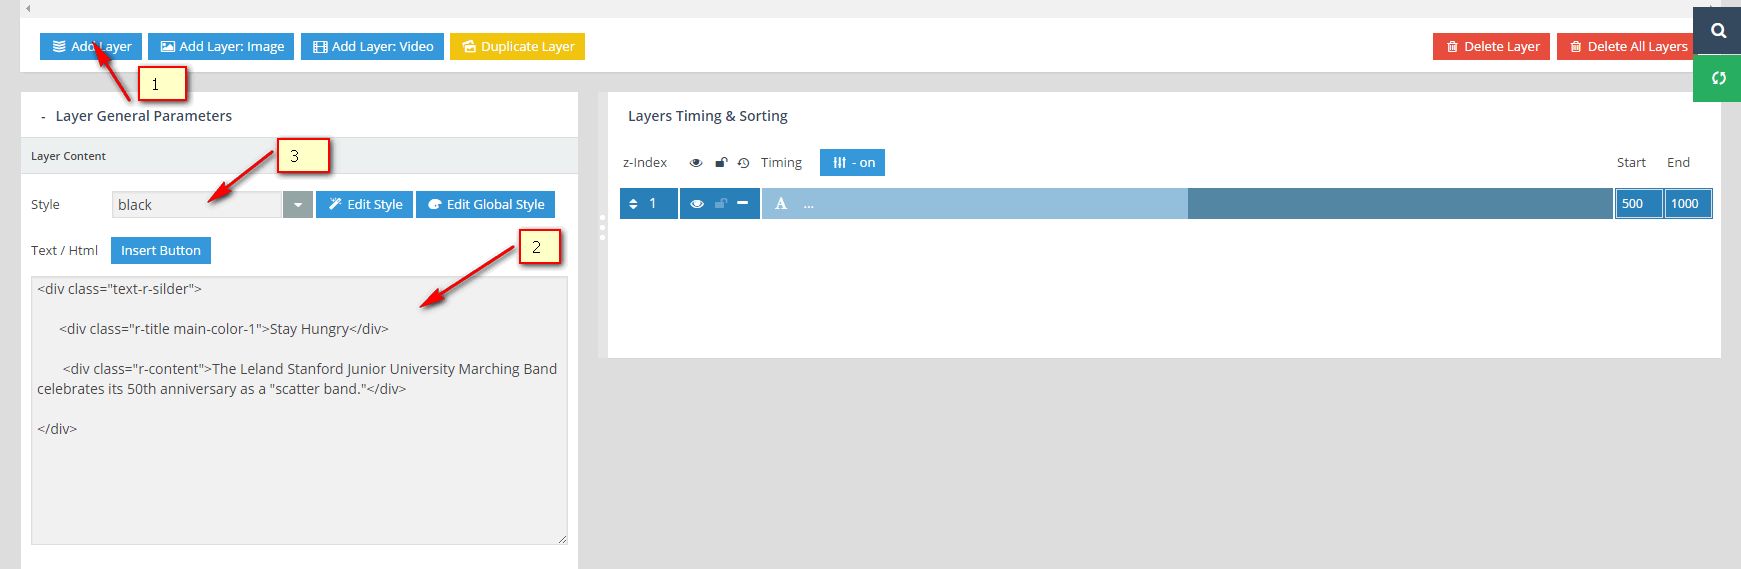
Style 2: In order to create a Custom Revolution Slider style as the image demo below, please following these steps
- Step 1: go to Revolution Slider > Edit Slides > Edit Slide
- Step 2: click "Add Layer"
- Step 3: enter this code into Text/Html
- Step 4: choose "Black" for Style
- Step 5: click Update Slide to save
Create Contact Page
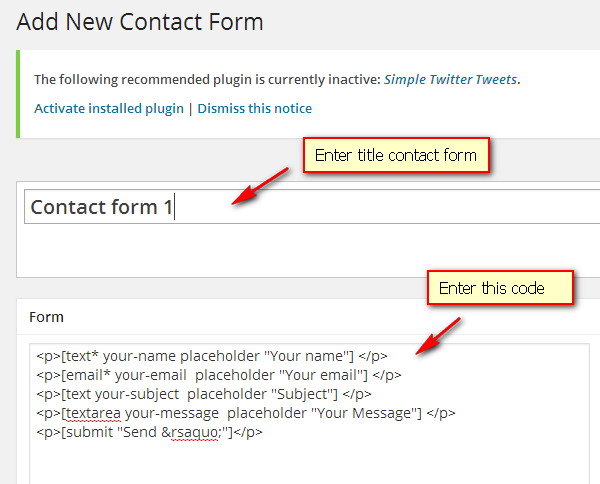
Create a Contact Form 7
- Install Contact form 7 plugin
- Go to Contact > Add New, enter form's title, and enter this code into Form and save it
- Save and copy the contact form shortcode

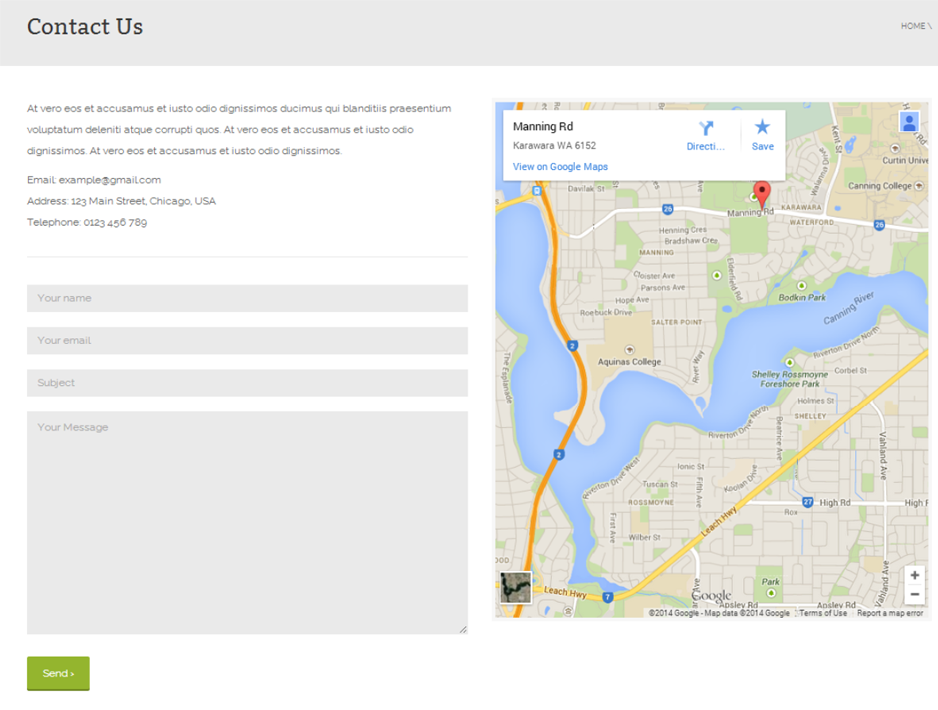
Configure Contact Page
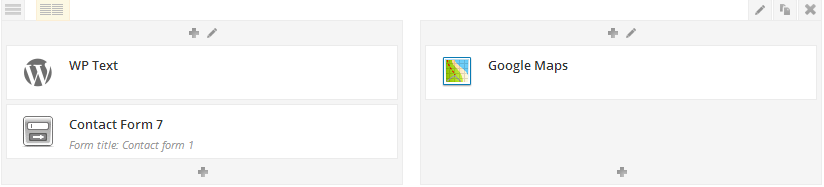
- Go to Pages > Add New page > Backend Editor > Add row and divide into two columns
- Click "plus sign" in column 1 and choose "WP Text"
and then enter content into "Text" and save.
Then, add Contact form 7 enter form title and Select contact form here.
(In order to have the list in form, you need to install Contact form 7 plugin and configure contact form, see how to configure below )
- Click "plus sign" in column 2 and choose "Google Maps"
and enter embed code of google map into Map embed iframe. In order to embed code, go to Google maps to create your map.
1) Find location 2) Click "Share" and make sure map is public on the web 3)
Click folder icon to reveal "Embed on my site" link 4) Copy iframe code and paste it here.
- Click Publish to save
 and then enter content into "Text" and save.
Then, add Contact form 7
and then enter content into "Text" and save.
Then, add Contact form 7 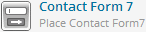 enter form title and Select contact form here.
(In order to have the list in form, you need to install Contact form 7 plugin and configure contact form, see how to configure below )
enter form title and Select contact form here.
(In order to have the list in form, you need to install Contact form 7 plugin and configure contact form, see how to configure below )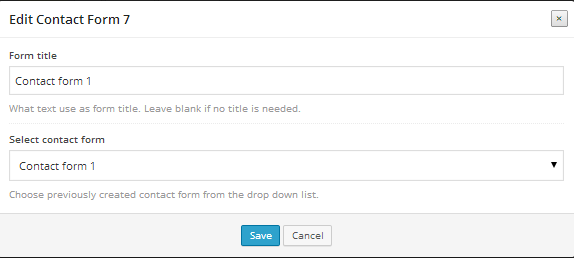
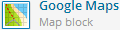 and enter embed code of google map into Map embed iframe. In order to embed code, go to Google maps to create your map.
1) Find location 2) Click "Share" and make sure map is public on the web 3)
Click folder icon to reveal "Embed on my site" link 4) Copy iframe code and paste it here.
and enter embed code of google map into Map embed iframe. In order to embed code, go to Google maps to create your map.
1) Find location 2) Click "Share" and make sure map is public on the web 3)
Click folder icon to reveal "Embed on my site" link 4) Copy iframe code and paste it here.

Members Page
- By default, the Members Page URL is http://yourdomain.com/member/. For example: http://demo.cactusthemes.com/university/member/
- Go to Appearance > Menus > Using the Custom Links box in the left column and paste link to URL textbox, click Add To Menu to add the item to the menu, then save.
- If you want to change the word member, go to U-Member Settings page and change Members Slug value. Remember to save the permalinks settings again in Settings > Permalinks
Events Page
- By default, the Events Page URL is http://yourdomain.com/event/. For example: http://demo.cactusthemes.com/university/event/
- Go to Appearance > Menus > Using the Custom Links box in the left column and paste link to URL textbox, click Add To Menu to add the item to the menu, then save.
- If you want to change the word event, go to U-Event Settings page and change Events Slug value. Remember to save the permalinks settings again in Settings > Permalinks
- Go to U-Event Settings to configure other things
Courses Page
- By default, the Professor Page URL is http://yourdomain.com/course/. For example: http://demo.cactusthemes.com/university/course/
- Go to Appearance > Menus > Using the Custom Links box in the left column and paste link to URL textbox, click Add To Menu to add the item to the menu, then save.
- If you want to change the word course, go to U-Course Settings page and change Courses Slug value. Remember to save the permalinks settings again in Settings > Permalinks
- Go to U-Course Settings to configure other things