University WordPress Theme
The Documentation
- Created: July 26th 2014
- http://themeforest.net/user/cactusthemes
- Email: [email protected]
For support please checkout CACTUSTHEME SUPPORT FORUM
University WordPress Theme
Welcome to University!
Thanks for Buying
First of all, thank you for buying our theme. We are a team of developers making awesome Wordpress Theme- University- An amazing Wordpress theme for Education organization, training centres and events. Our product is focused on Courses and Events. University's basic feature is to purchase/enroll event online. However, it can be used for either a business home page or a shopping site. To make your experience pleasant, we have added as much information as needed in this documentation. If you you're stuck with anything, please refer to be supported.
Created By: CactusThemes.com
Support Site: http://ticket.cactusthemes.com
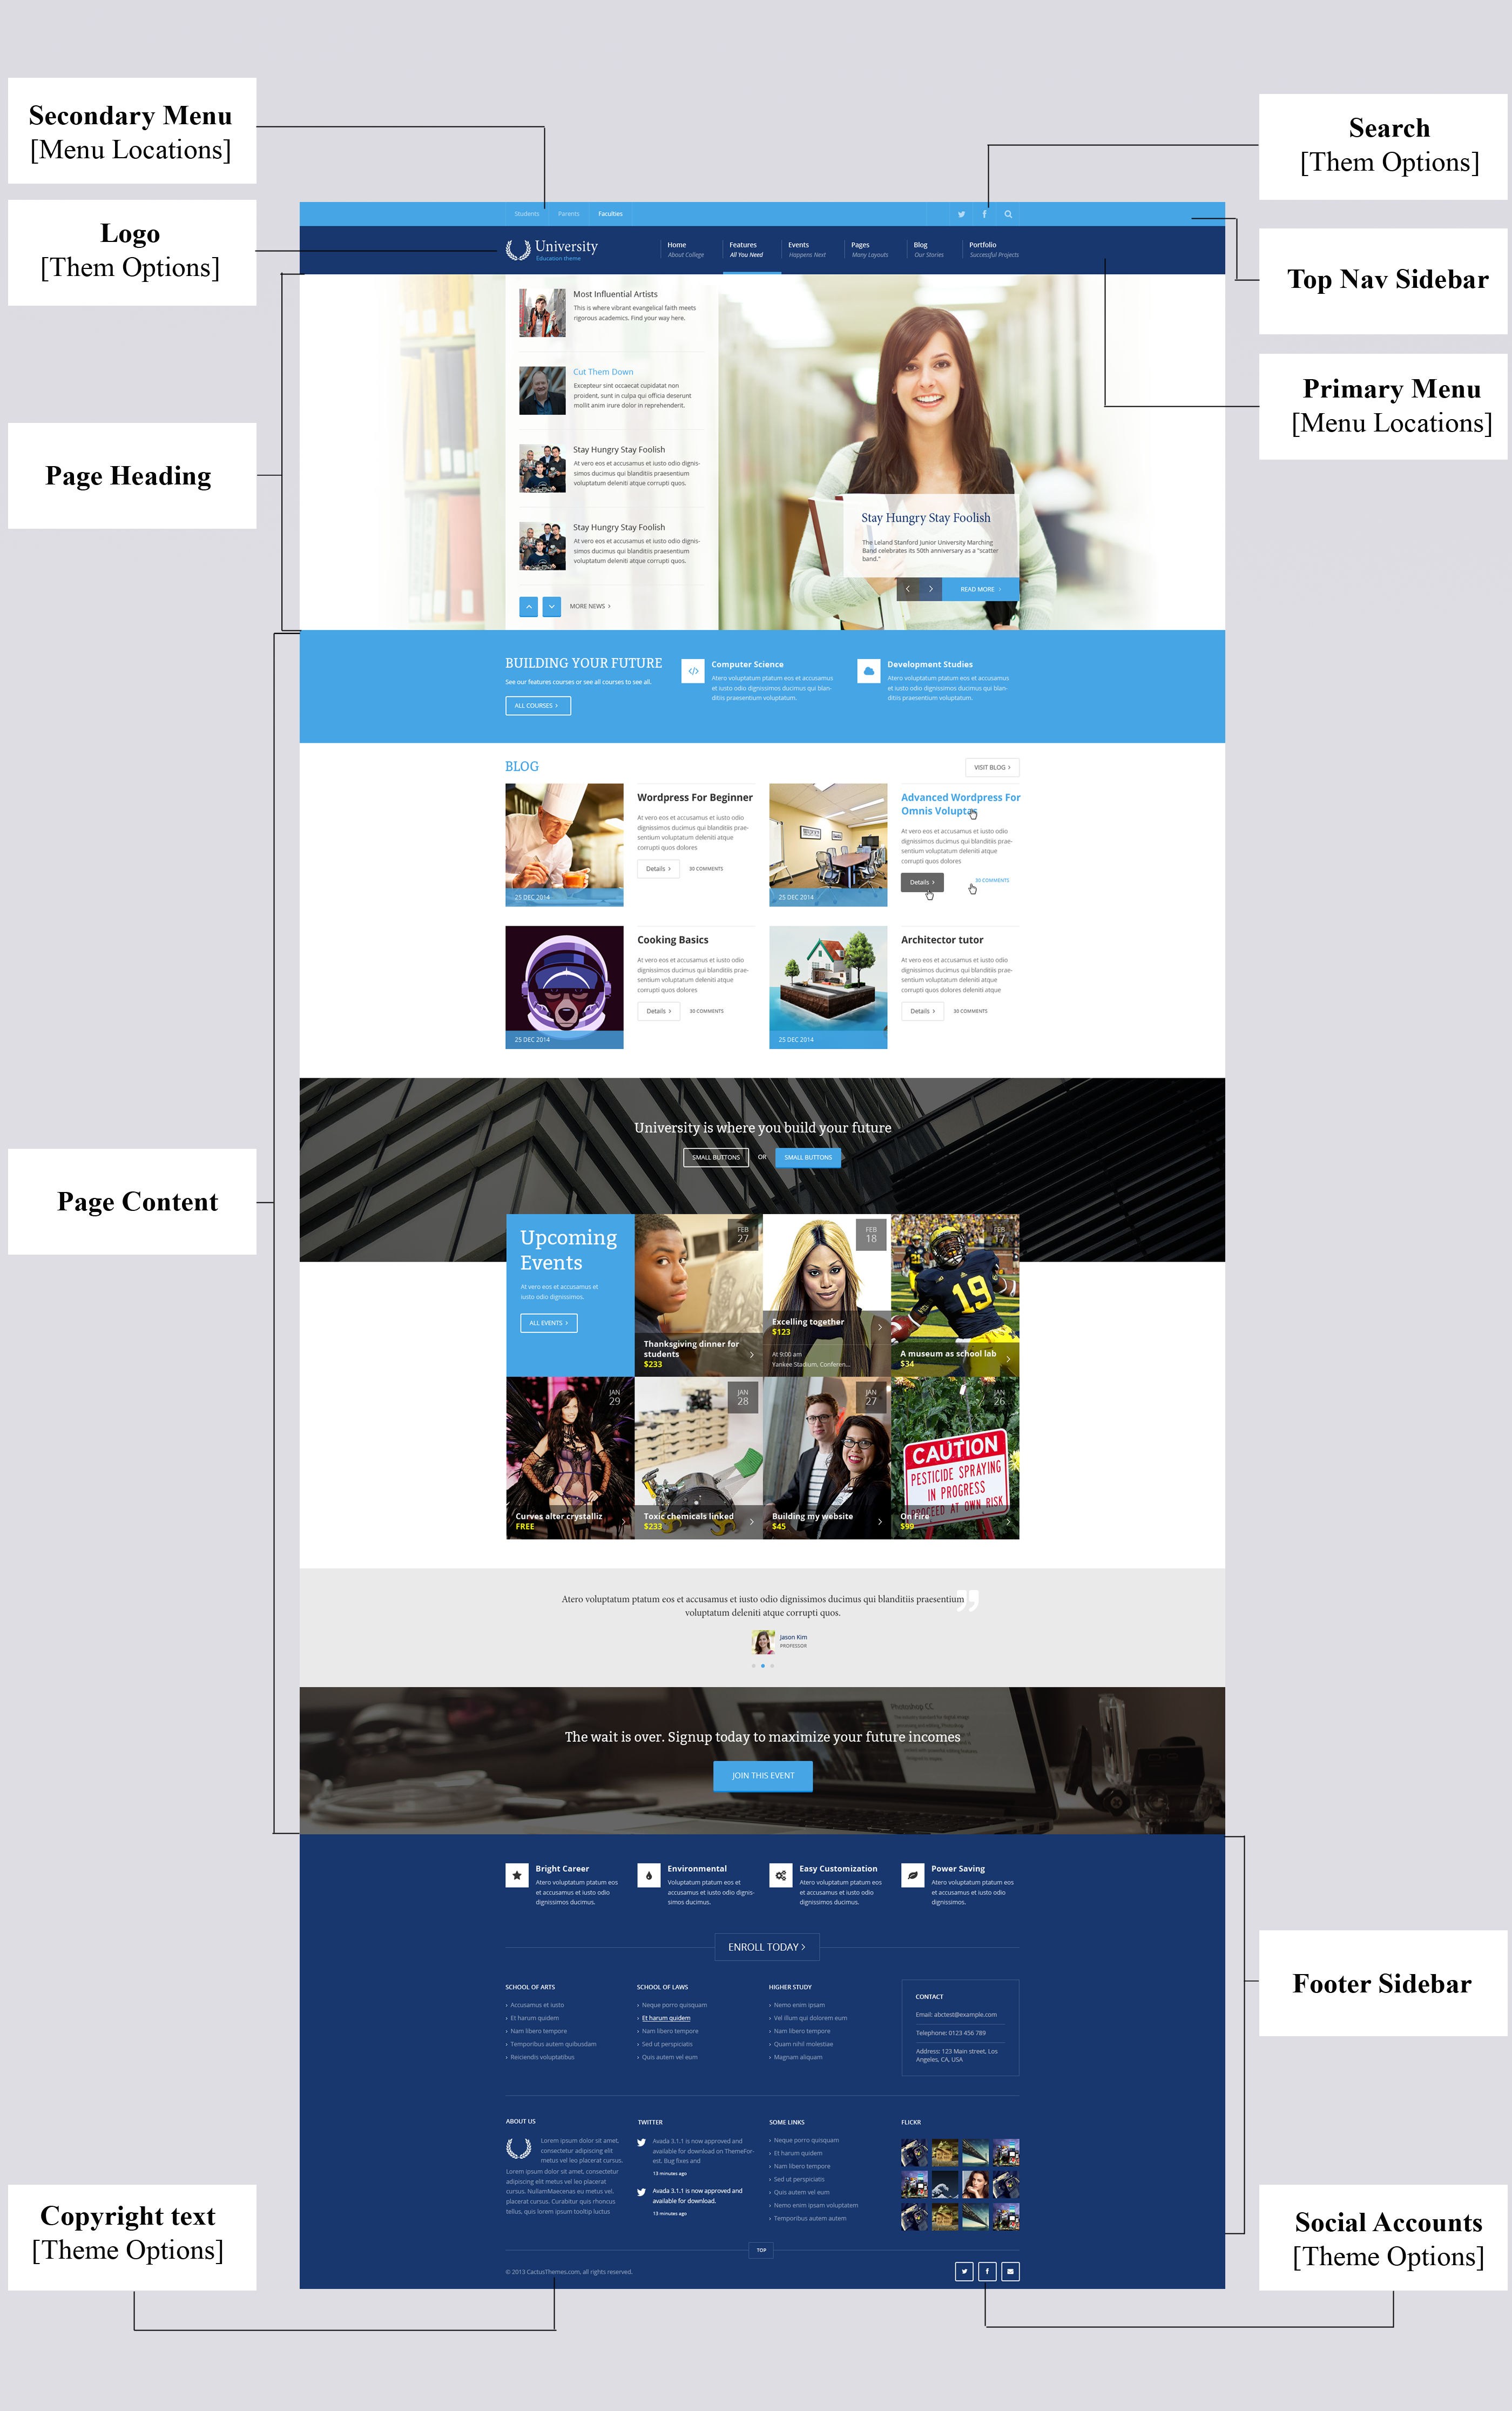
University Layout
Installation
- Documentation folder - contains this document and other materials
- Installation Files folder - contains all installable files, including theme & plugins
- theme/university.zip - University theme
- plugins/u-shortcodes.zip - A plugin which contains all shortcodes for theme which helps you visually build pages.
- plugins/u-course.zip - A plugin which enables Course feature for theme
- plugins/u-event.zip - A plugin which enables Event feature for theme
- plugins/u-member.zip - A plugin which enables Member feature for theme
- plugins/plg-visual-composer.zip - ($25) A page builder plugin for WordPress (visit Visual Composer)
- plugins/plg-revslider.zip- ($16) The amazing Revolution Slider which creates beautiful image sliders for your website (visit Revolution Slider
It is recommended to install Visual Composer and u-shortcodes plugins at least. Other plugins are optional, which mean you can choose the necessary ones the install.
Install via WordPress
- Login to WordPress Admin
- In the left menu panel go to Appearance > Themes > Add New to install theme, or Plugins > Add New > Upload to install plugins
- Click Upload
- Browse your download package to select installation files
- Click Install Now button.
- Once it's uploaded, click the Activate link
Install via FTP
- Use your FTP software to browse to wp-content/themes folder to install theme or wp-content/plugins folder to install plugins
- Extract the installation files to their corresponding folders, for example university.zip to university and upload to server
- Once it's uploaded, go to your WordPress Admin, browse to Appearance > Themes or Plugins > Installed Plugins
- Click the Activate link
Go to Plugins > Add New to install and activate plugins
- Contact Form 7 - Simple but flexible contact form plugin
- WP PageNavi - Add a more advanced paging navigation to your WordPress blog
- Category Images - Allow to add image to category
- WooCommerce - An e-commerce toolkit that helps you sell anything. Beautifully.
- Regenerate Thumbnails - Allow you to regenerate all thumbnails after changing the thumbnail sizes.
- Flickr Badges Widget - Display your Flickr latest photostream in widget area using javascript. Easy to customize, just put your Flickr id and your widget ready to lunch.
- Black Studio TinyMCE Widget - Add a WYSIWYG widget based on the standard TinyMCE WordPress visual editor.
Update Theme
Manual Update
Update new version is straight-forward as following steps:
- Deactive current theme by going to Appearance > Themes and activate any other themes such as the default Wordpress 3.6 's Twenty Eleven.
- Delete older version by clicking on Delete link. Confirm to delete.
- Update and re-install new version.
All posts and settings will be saved. This is data-safe method.
Auto Update
- Go to Plugins > Add News > Upload, find and install /plugins/envato-wordpress-toolkit.zip file (in the download package)
- To establish an Envato Marketplace API connection navigate to the Envato Toolkit page and insert your Marketplace username and secret API key in the designated input fields. To obtain your API Key, visit your "My Settings" page on any of the Envato Marketplaces
- Once the API connection has been established you will see a list of themes that can be auto installed. If you don't see any themes and are certain you've done everything correct, there is a good chance the theme author has not updated their theme to be available for auto install and update. If that's the case, please contact the theme author and ask them to update their theme's information
- Note Only theme is updated. Related plugins must be updated manually. Please check release logs to see if you need to update plugins
Install Sample Data
One+ Click Install
Before starting, there are some notes worth checking:
- Make sure you have installed all recommended plugins before importing sample data, including
- University Shortcodes (in download package)
- University Event (in download package)
- University Course (in download package)
- University Member (in download package)
- Revolution Slider (in download package)
- WPBakery Visual Composer (in download package)
- Black Studio TinyMCE Widget (from WordPress.org)
- Contact Form 7 (from WordPress.org)
- Flickr Badges Widget (from WordPress.org)
- WP PageNavi (from WordPress.org)
- WooCommerce (from WordPress.org)
- It is better to install sample data on a fresh Wordpress installation. Therefore, you may want to reset your site to default settings. Install and use Wordpress Reset plugin to do that. After installed, go to Tools > Reset
- The import process may take several minutes due to large data and your server capacity. If your server setting "Max Execution Time" is too low, increase it (as your hosting provider). Please do not close the browser until it finishes. If it fails, you can run this process again until seeing the "Success Message". Demo Images are not installed due to some copyrighted licenses
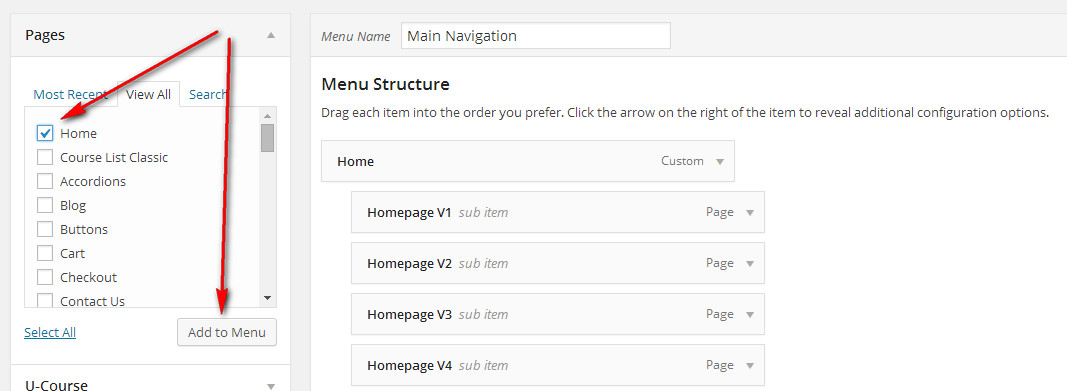
- If you have to run the process more than once, menu items may be duplicated. Just go to Appearance > Menus and edit/delete Main Menu items
- Feature images are not imported (We use licensed photos on our demo page)
- Go to Appearance > Theme Options, scroll to bottom, you will see a button Import Sample Data. Click on that and confirm to install sample data.

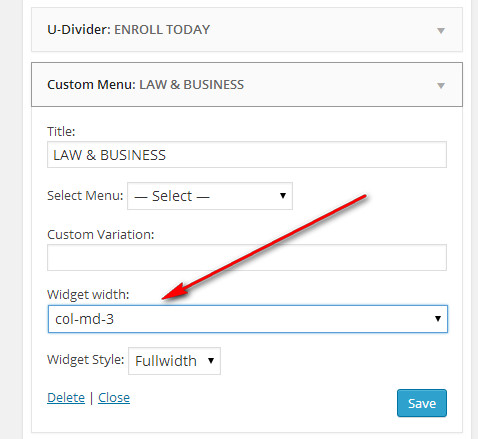
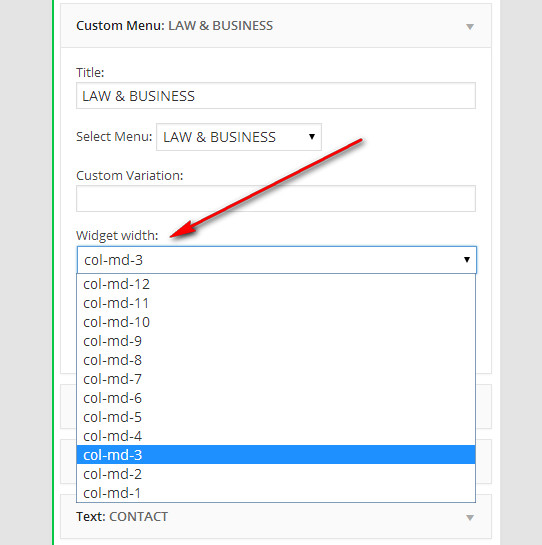
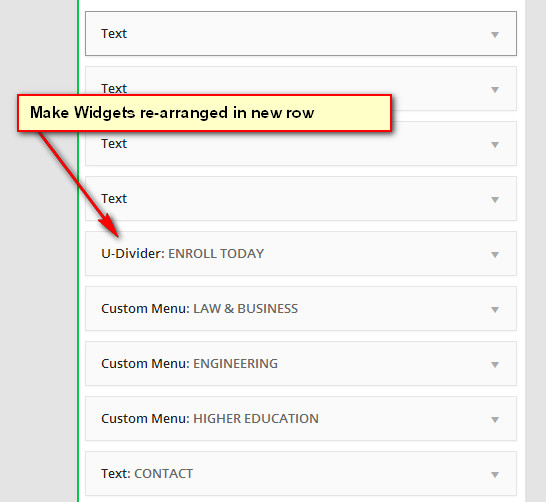
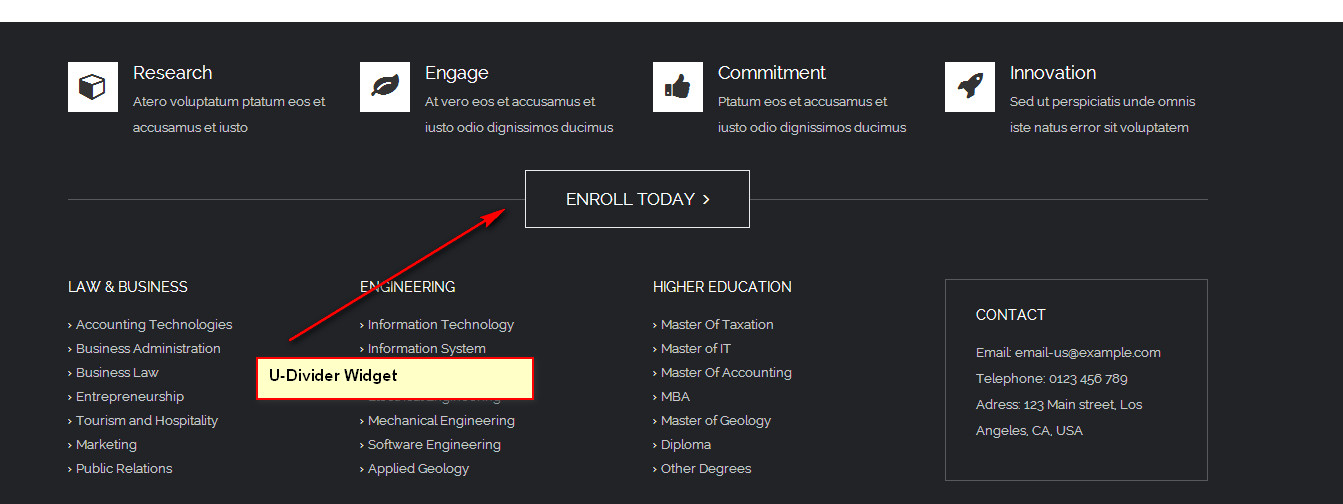
- (Additional) Go to Appearance > Widgets, click on each widgets in Footer Sidebar, excerpt U-Divider widgets, and change the Widgets Width setting to col-md-3

Import Manually
- university.xml All Data
- theme-options.txt Theme Options Settings
- university-widgets.json Widgets settings
How To Create Home Page
- Create two new pages in WordPress (under Pages > Add new), and publish them.
For the purpose of example, we’ll call these “Home” (for the front, or Home, page) and “Blog”. - Go to Settings > Reading Settings, and under “Front page displays”, click the radio button for A static page.
Select “Welcome” in the first drop down (for Front page), and select “Blog” in the second one (for Posts page). Save the changes.
Frontpage Templates
University provides some Frontpage templates to configure special Frontpage (or Home). Current version (1.0) only has one.
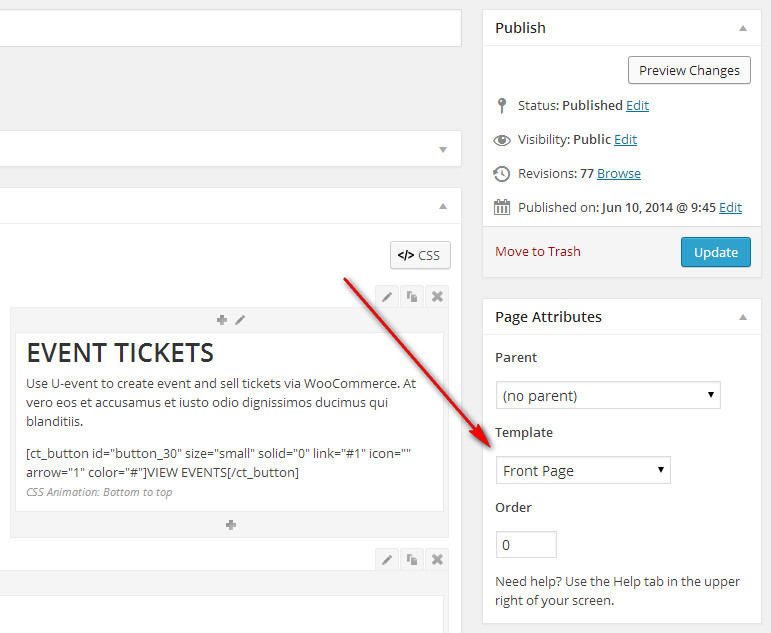
- Go to Pages > All Pages and edit “Home” page created in previous step
-
Choose "Front Page" in Template. The corresponding metadata will be displayed in the box Front Page Header Settings in the left.

- Configure the settings. To make it look like our demo page, see Please see the instruction about how to configure homepage here
-
Layout settings
Sidebar Select "Default" to use settings in Theme Options or Front page fullwidth . If you do not choose “Default”, page will be formatted with “Left” sidebar , “Right” sidebar or no sidebar (“Hidden“) Content padding Enable default top and bottom padding for content (30px) Front Page Header Settings
Header Background Choose the type of background's display. In which
- Background Image: Background Header is static image. Upload and/or choose an image here
- Revolution Slider: Background Header is a slider using features of Revolution Slider plugin. In order to display Slider, you need to create slider in Revolution Slider and then enter (alias) name here (Configure Header with Revolution Slider see here)
- Custom Content: Background Header will use content in Front Page Sidebar. Go to Appearance > Widgets and drag a widget into this sidebar
Header Custom Height (Optional) Enter custom height (number of pixel, ex: 400) Overlay content Display articles on top of background content
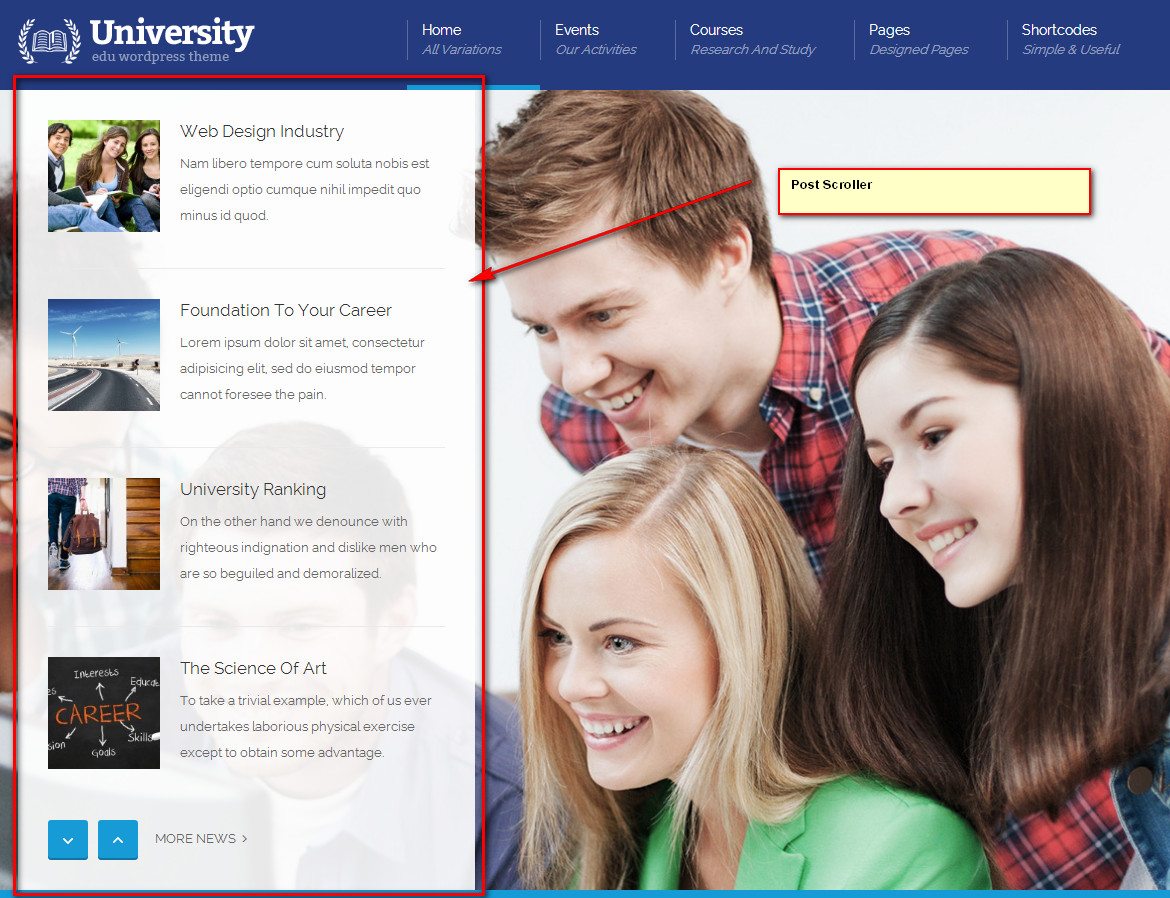
- Post Scroller

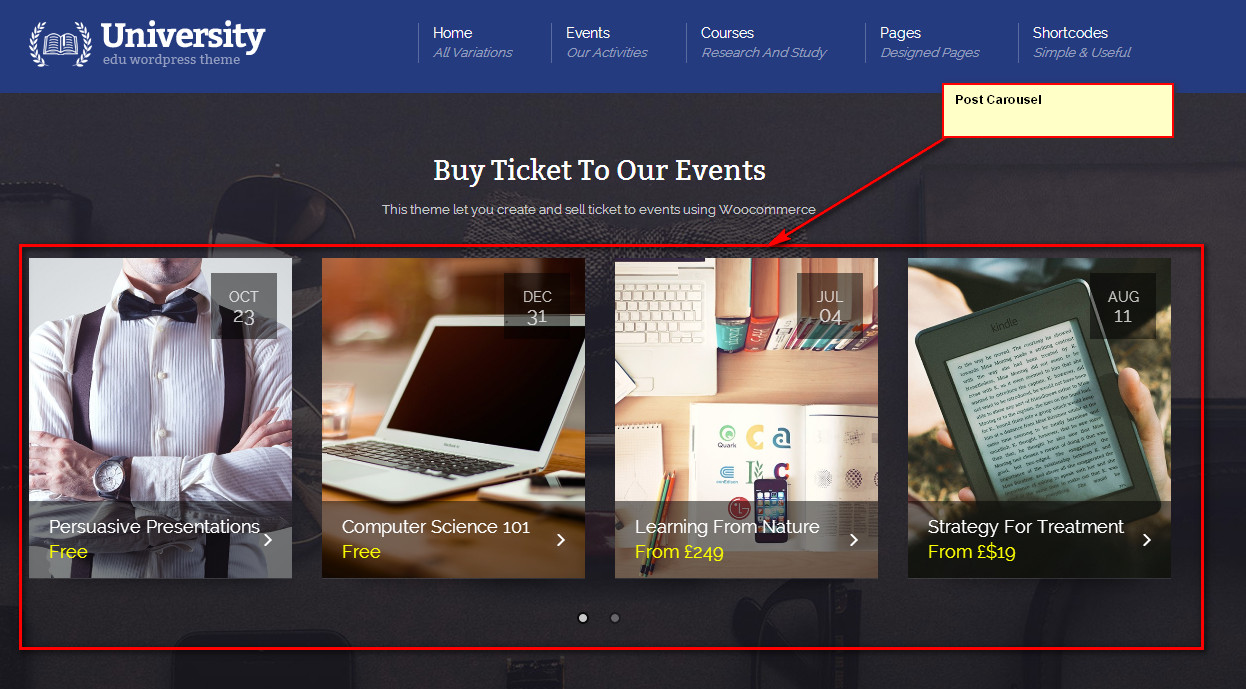
- Post Carousel

Post type Choose the type of content's display of Overlay Content on Header
- Post: Types of display are articles in Posts
- Event: Types of display are articles in Event
- Course: Types of display are articles in Course
Category The content of Overlay Content on Header will be displayed by Categories. Enter list of category ID (or slug), separated by a comma (for Overlay Content) Tags The content of Overlay Content on Header will be displayed by Tags. Enter list of tags, separated by a comma (for Overlay Content) IDs Specify post IDs to retrieve (for Overlay Content) Count Number of posts to show (for Overlay Content) Visible items Number of items visible in Carousel. Default is 4 (for Overlay Content) Order Arrange the news according to the criteria of "Order by"- ascending order or descending order Order by Choose criteria to arrange Meta Key Name of meta key for ordering (for Overlay Content) Show date Show date info. With standard posts, this is Published Date. With Event and Course, this is Start Date Show price Hide or show price Show Venue Show Venue with Event & Course post type, or Show Author for Standard post Show Time Show start time. Only works with Event & Course post type
-
Theme Options
University comes with a lot of options to help you totally customize the look & feel of your site. Go to Appearance > Theme Options to configure.
There are settings for General, Colors, Fonts, Single Post, Single Page, Archives, 404, WooCommerce, Social Accounts, Social Sharing. Below is the detail of how to use those functions.
General
- Enable Search: Enable or disable default search form in every pages

- SEO - Echo Meta Tags: By default, University generates its own SEO meta tags (for example: Facebook Meta Tags). If you are using another SEO plugin like YOAST or a Facebook plugin, you can turn off this option
- Copyright Text: Appear in footer

- RTL Mode: Support right-to-left language

- Custom CSS: Enter custom CSS. Ex: .class{ font-size: 13px; }
- Custom Code: Enter custom code or JS code here. For example, enter Google Analytics
- Favicon: Upload favicon (.ico) is image file of page's title section

- Logo Image: Upload your logo image

- Retina Logo (optional): Retina logo should be two time bigger than the custom logo. Retina Logo is optional, use this setting if you want to strictly support retina devices.
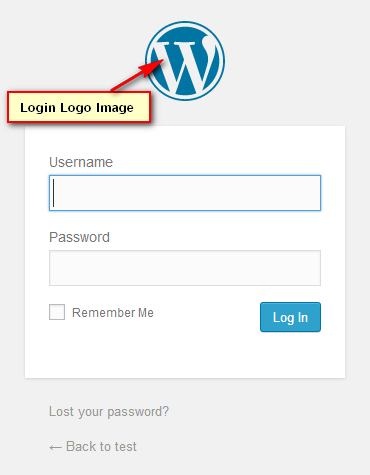
- Login Logo Image: Upload your Admin Login logo image

- Scroll Top button: Enable Scroll Top button (when clicking "Top", it will scroll site which is at the bottom of page to top of the page)

Colors
- Main color 1: Choose Main color 1 (Default is light blue #46a5e5) is the background color of Secondary Menu bar

- Main color 2: Choose Main color 2 (Default is dark blue #17376e) is the background color of Primary Menu bar

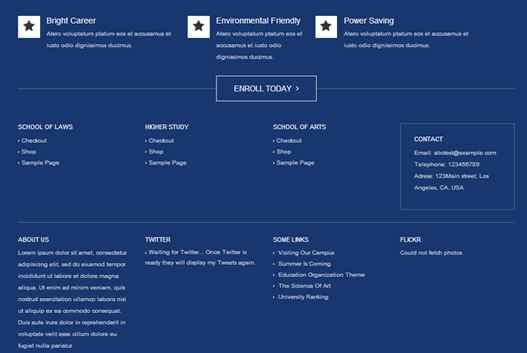
- Footer Background Color: Choose Footer background color (Default is Main color 2) is the background color of Footer Sidebar

Fonts
- Main Font Family: Enter font-family name here. Google Fonts are supported. For example, if you choose "Source Code Pro" Google Font with font-weight 400,500,600, enter Source Code Pro:400,500,600
- Heading Font Family: Enter font-family name here. Google Fonts are supported. For example, if you choose "Source Code Pro" Google Font with font-weight 400,500,600, enter Source Code Pro:400,500,600. Only few heading texts are affected
- Main Font Size: Select base font size (px)
- Upload Custom Font 1: Upload your own font and enter name "custom-font-1" in "Main Font Family" or "Heading Font Family" setting above
- Upload Custom Font 2 Upload your own font and enter name "custom-font-2" in "Main Font Family" or "Heading Font Family" setting above
- Content Letter Spacing: It is the space among characters in Content for all pages
- Heading Letter Spacing: It is the space among characters in Heading for all pages
Navigation
- Style: Styles menu
- Style 1(Default)

- Style 2

- Style 3

- Style 1(Default)
- Callout Text: Display on Main Navigation, used with Style 3

- Sticky Menu: Hide/Show sticky memu
- Sticky Menu Layout: Use/Do not use Logo on the sticky menu

- Logo Image For Sticky Menu: Upload your logo image for sticky menu
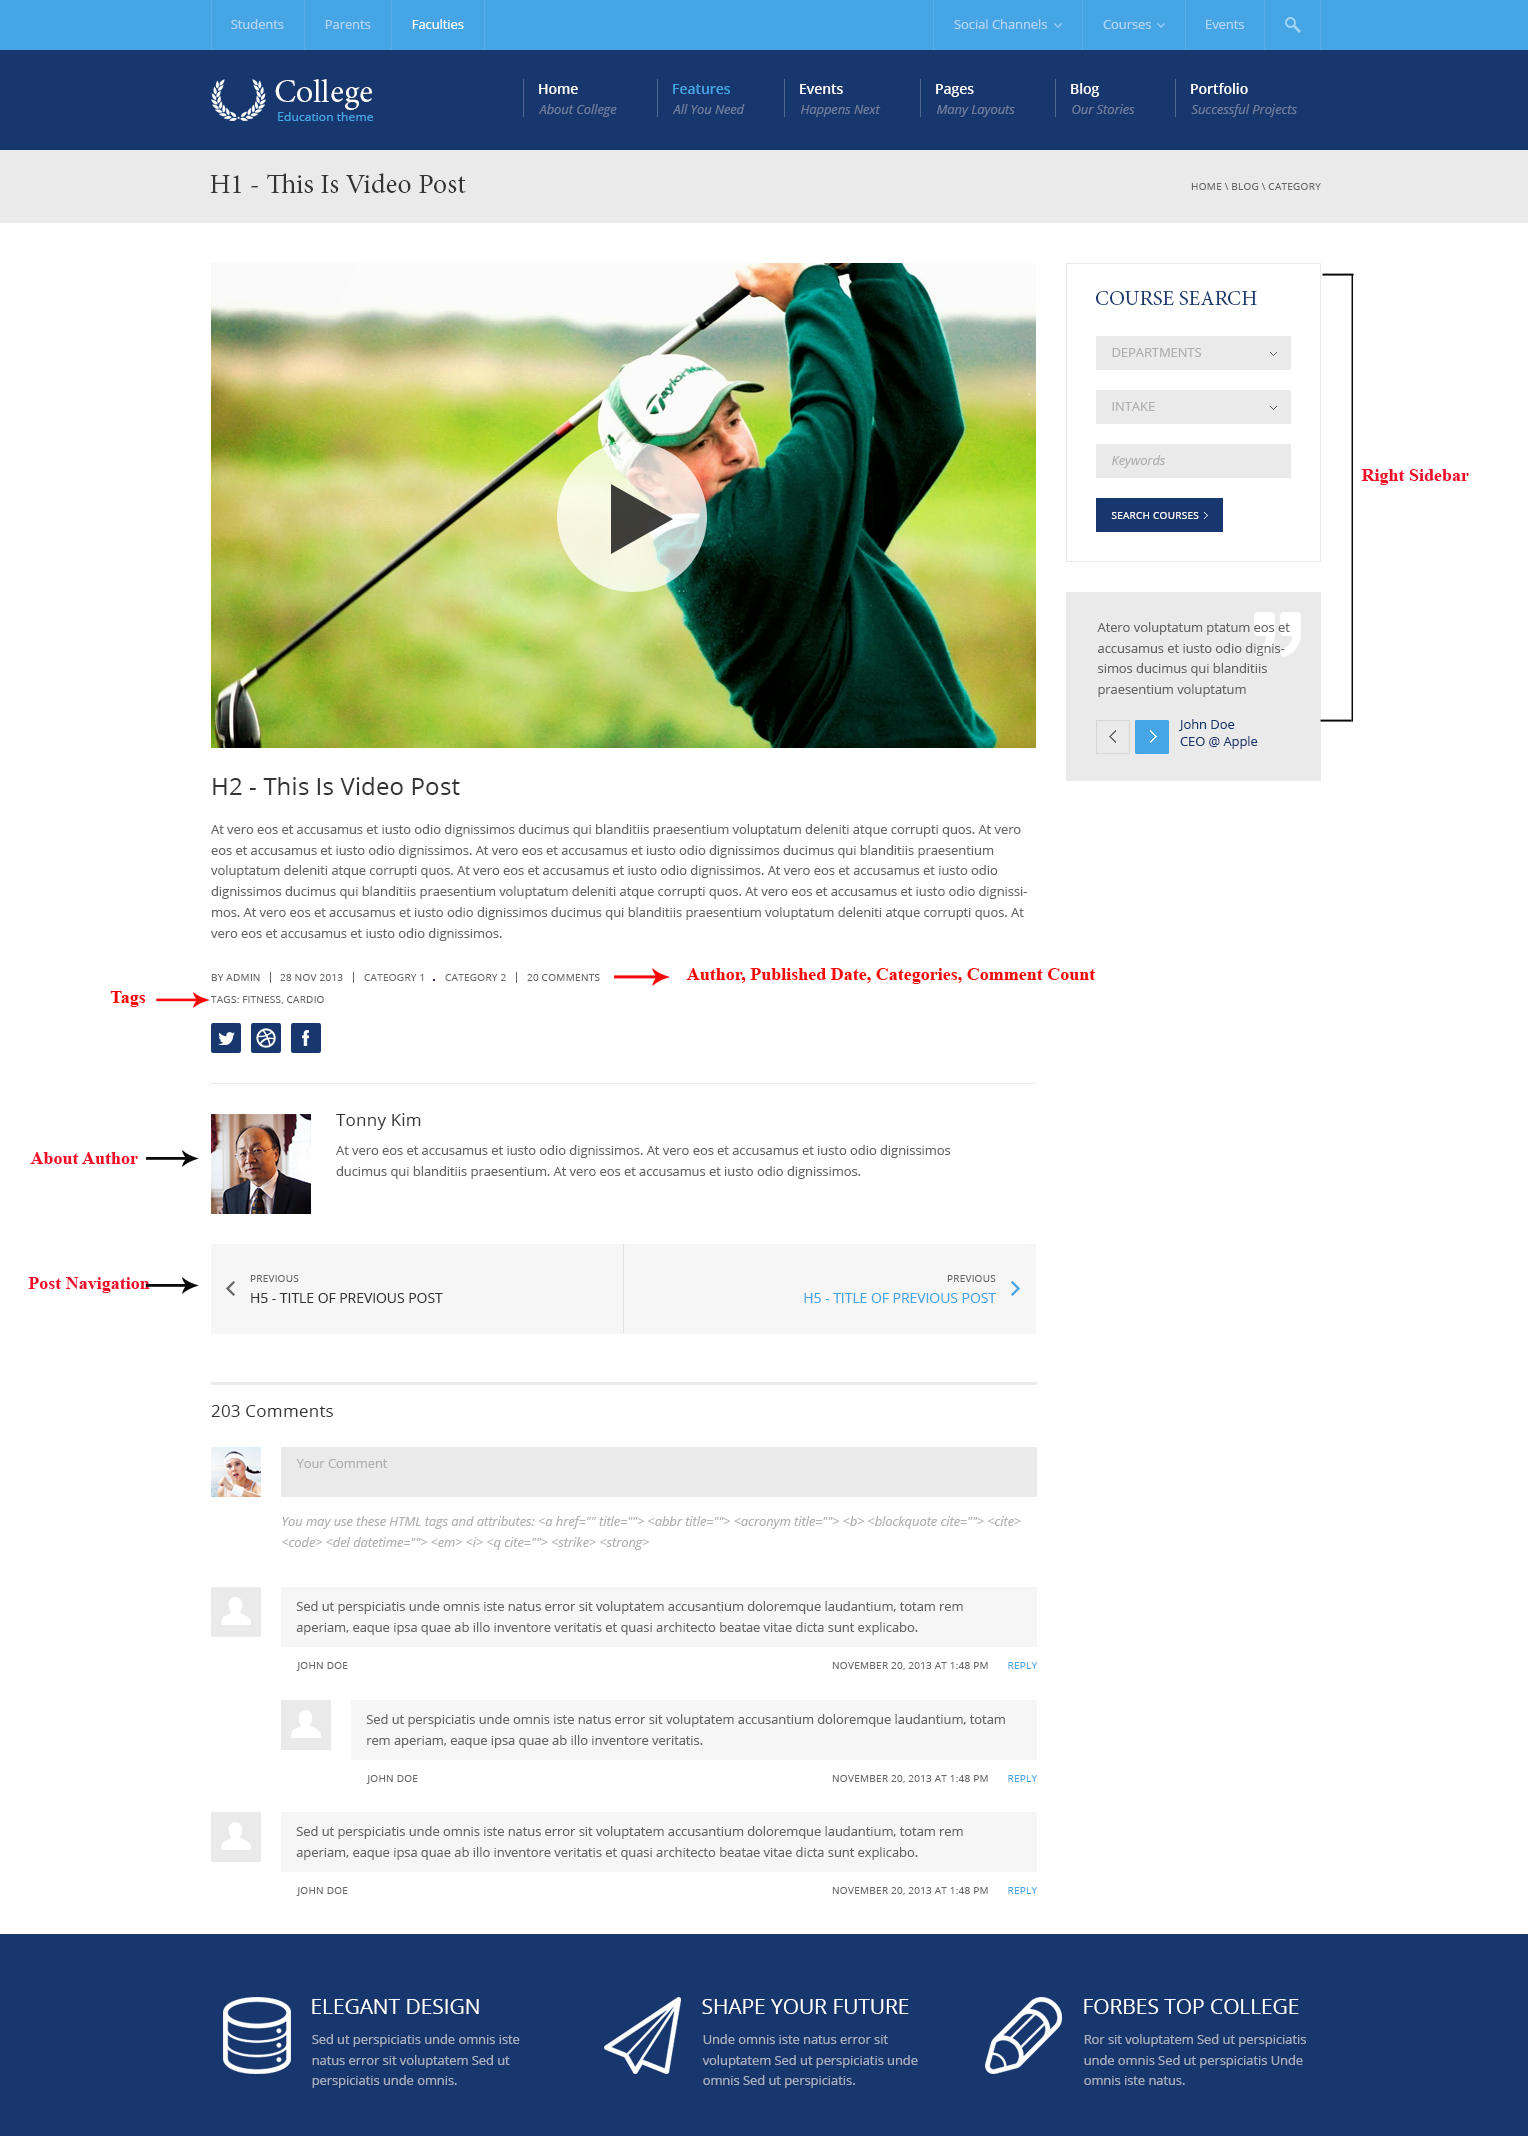
Single post
- Sidebar: Hide/show left or right Sidebar
- Author: Enable Author information
- About Author: Enable About Author information
- Published Date: Enable Published Date information
- Categories: Enable Categories information
- Tags: Enable Tags information
- Comment Count: Enable Comment Count Info
- Posts Navigation: Enable Post Navigation
Single Page
- Sidebar: Hide/show left or right Sidebar. This setting can be overriden in each page
Archives
- Archives: Select default Sidebar position for Archive pages (Posts, Categories, Tags, Author, Search Result pages)
404
- Page Title: Enter title for announcing page
- Page Content: Enter announcing content
- Search Form: Enable Search Form in 404 page

Social Accounts
- Facebook: Enter full link to your profile page
- Twitter: Enter full link to your profile page
- LinkedIn : Enter full link to your profile page
- Tumblr : Enter full link to your profile page
- Google Plus : Enter full link to your profile page
- Pinterest : Enter full link to your profile page
- YouTube : full link to your profile page
- Flickr : Enter full link to your profile page
- Email: Enter email contact
Social Sharing
- Facebook: Enable Facebook Share button
- Twitter: Enable Twitter Share button
- LinkedIn : Enable LinkedIn Share button
- Tumblr : Enable Tumblr Share button
- Google + : Enable Google+ Share button
- Pinterest : Enable Pinterest Pin button
University Shortcodes
Shortcodes can be used in either Classic Editor or Visual Composer mode (require Visual Composer plugin installed). You can type shortcode directly in Classic Editor or use Visual Composer element to configure the shortcode
How to use Shortcodes
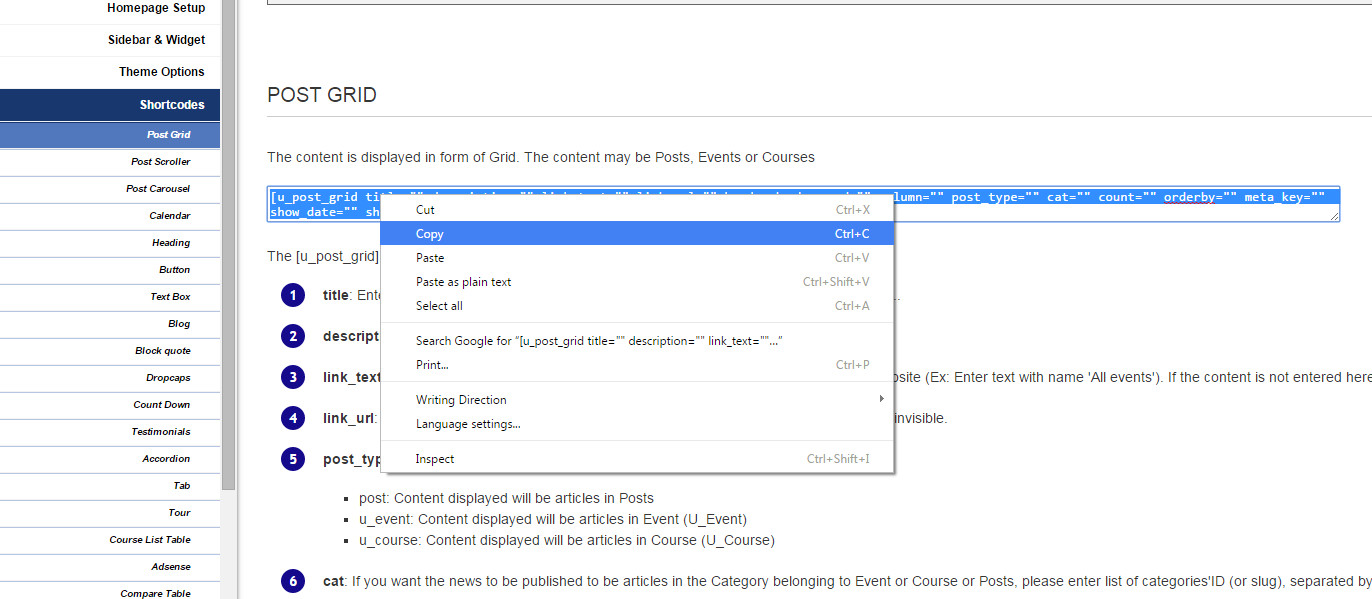
- Option 1: Copy the shortcode sample from our document and paste that into Page or Post content, then enter needed values. See the description image below


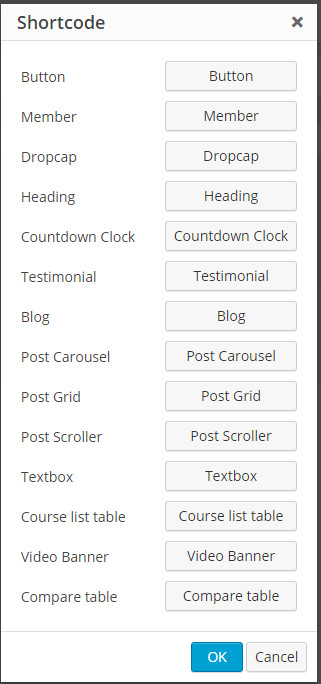
- Option 2: Insert shortcode to Classic Editor using Cactus-Shortcode Icon on the editor toolbar

- Click the shortcode icon
 to open the window in which there is a list of shortcodes

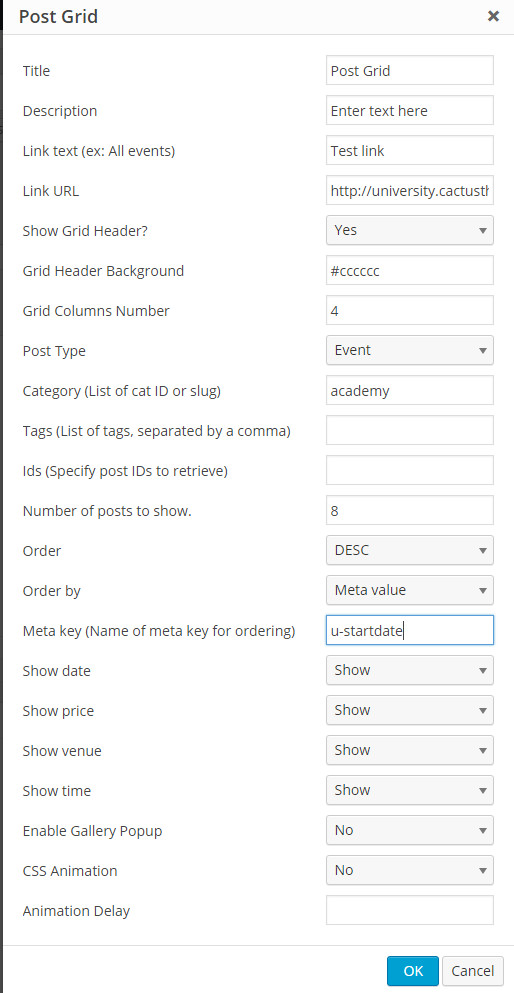
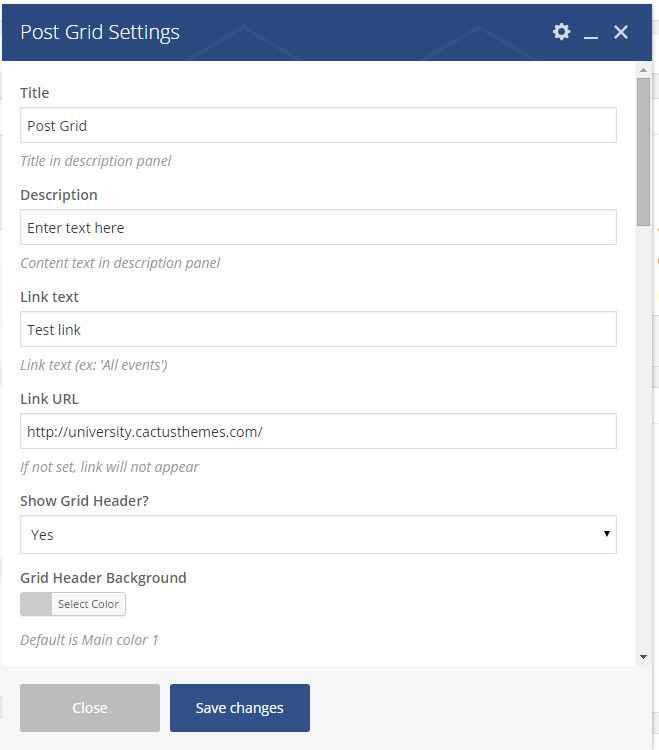
- Click a shortcode buton (for example: Post Grid shortcode), then enter needed values

- Click OK to insert shortcode into the editor

- Click the shortcode icon
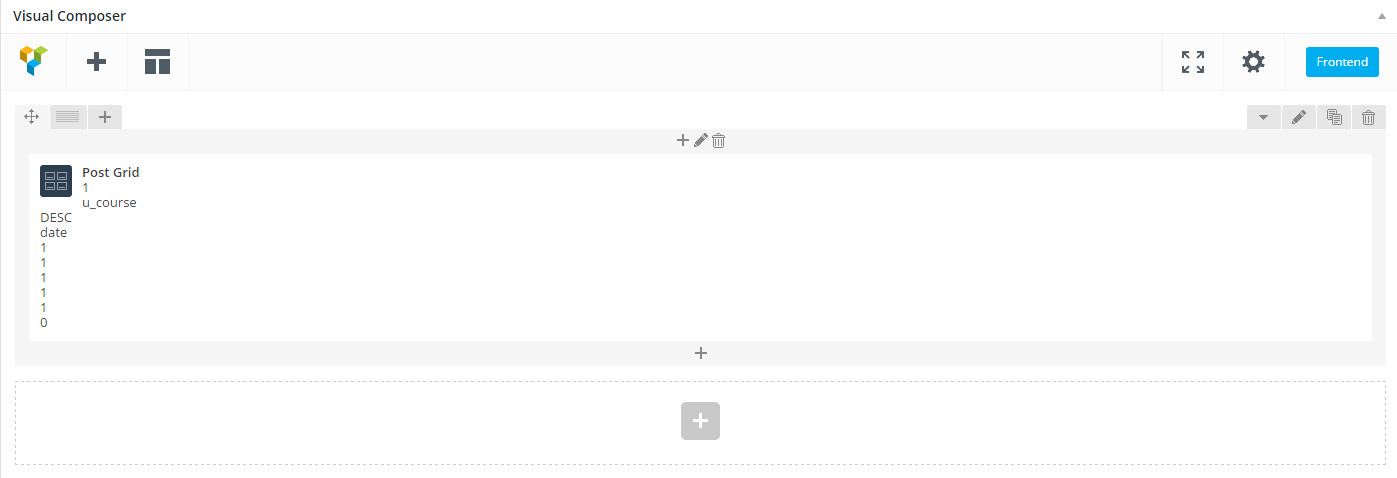
- Option 3: Use Backend Editor (Visual Composer)
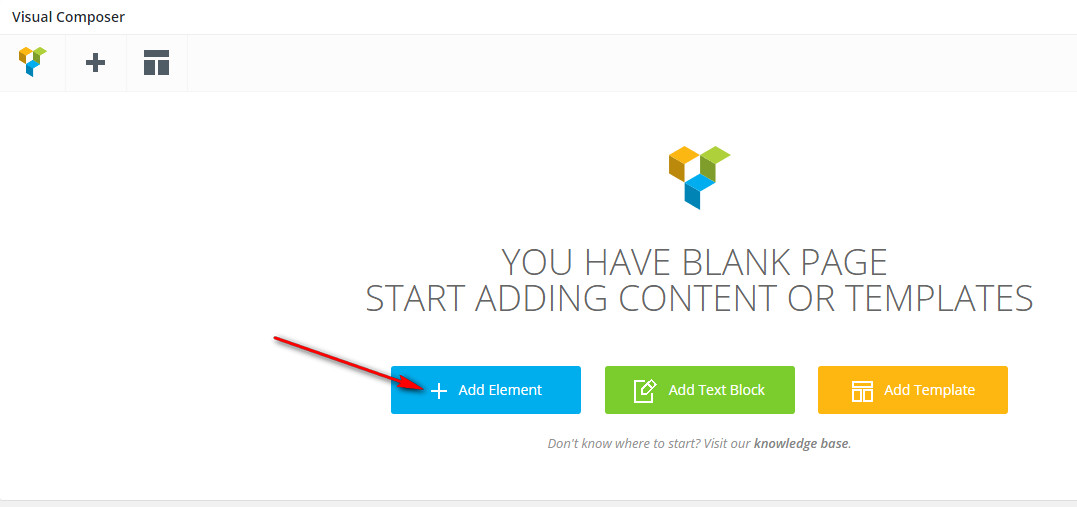
- Click Backend Editor

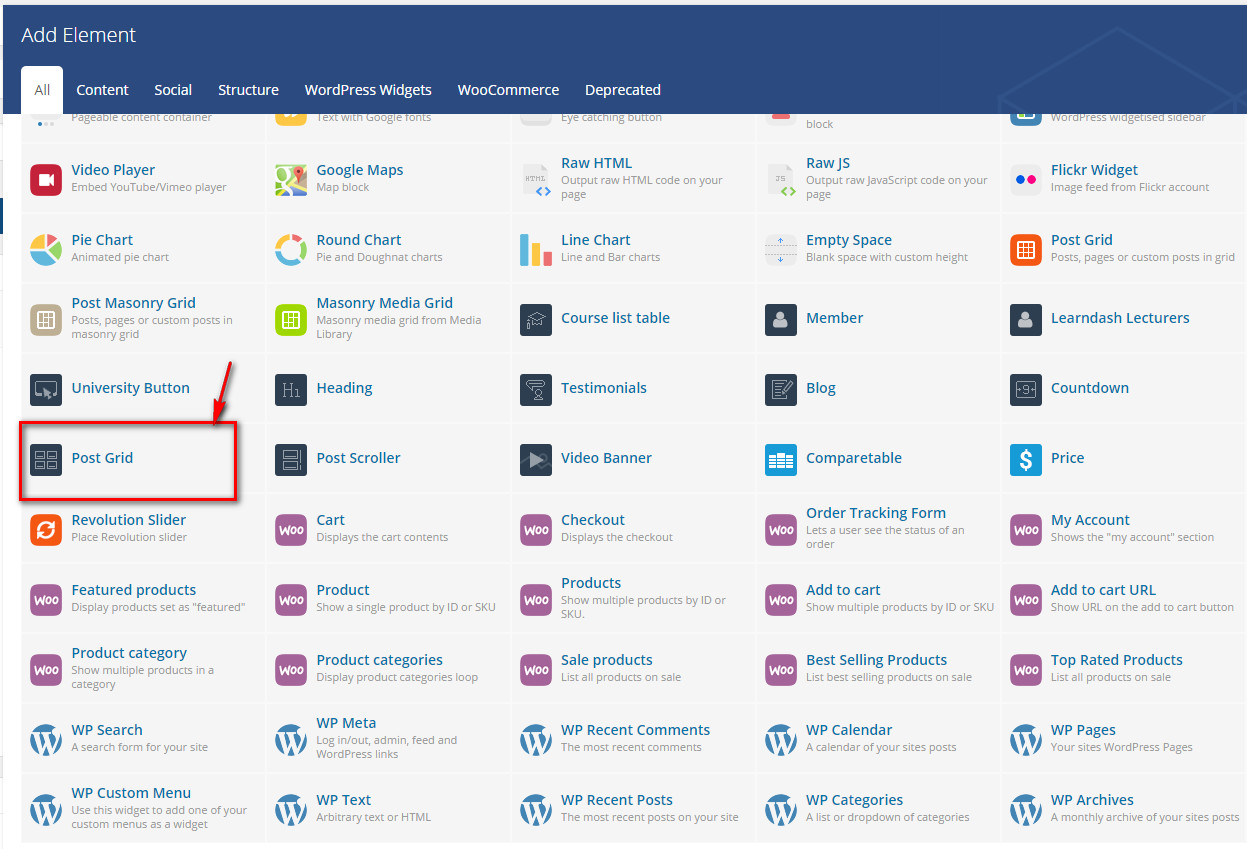
- Click Add Element

- Click a shortcode (for example: Post Grid shortcode), then enter needed values


- Click Save Change to insert shortcide into the editor

- Click Backend Editor
Post Grid
The content is displayed in form of Grid. The content may be Posts, Events or Courses
The [u_post_grid] shortcode has the following variables/options:
- title: Enter title for description content, the content may be article for an event or a course....
- description: Content text in description panel
- link_text: Enter text for button, when users click this text, they will be linked to another website (Ex: Enter text with name 'All events'). If the content is not entered here, the default text will be "View All"
- link_url: Enter link URL needing to create a link, if it is empty, the button "Link text" will be invisible.
- post_type :Choose types of post needing to display, there are three options
- post: Displayed content will be articles in Posts
- u_event: Displayed content will be articles in Event (U_Event)
- u_course: Displayed content will be articles in Course (U_Course)
- cat: If you want the news to be published to be articles in the Category belonging to Event or Course or Posts, please enter list of categories'ID (or slug), separated by a comma
- tag: If you want the news to be published to be articles in Tags belonging to Event or Course or Posts, please enter list of tags, separated by a comma
- ids: If you want the news to be published to be articles, events, courses, please enter the correct ID name of Posts, Events, Courses
- count: Enter Number of posts to show. Default is 7
- oder: Arrange the news according to the criteria of "Order by"- ascending order or descending order
- oderby: Arranging criteria
- date: Arranged by showing according to date( The default value is Date)
- none: No order
- ID: Order by post ID. Note the captialization.
- author: Order by author.
- title: Order by title.
- name: Order by post name (post slug).
- date: Order by date.
- modified: Order by last modified date.
- parent: Order by post/page parent id.
- rand: Random order.
- comment_count: Order by number of comments
- menu_order: Order by Page Order.
- meta_value: Note that a 'meta_key=keyname' must also be present in the query. Note also that the sorting will be alphabetical which is fine for strings (i.e. words), but can be unexpected for numbers (e.g. 1, 3, 34, 4, 56, 6, etc, rather than 1, 3, 4, 6, 34, 56 as you might naturally expect). Use 'meta_value_num' instead for numeric values.
- meta_value_num: Order by numeric meta value (available with Version 2.8). Also note that a 'meta_key=keyname' must also be present in the query. This value allows for numerical sorting as noted above in 'meta_value'.
- post_in: Preserve post ID order given in the post__in array
- recent: Display the happening Events based on Start date. Arranged in chronological order of the closest events
- upcoming: Display the upcoming Events/Course based on Start Date. Arranged by chronological order of the upcoming events/courses
- meta_key : Name of meta key for ordering
- show_date: Default 1/true (note: 0/false, 1/true)- show or hide published date (for post) or start-date (for course, event)
- show_price: Show or hide price
- show_venue: Show or hide Venue with Event & Course post type, or Show Author for Standard post
- show_time: Show start time. Only works with Event & Course post type
- gallery: Enable Gallery Popup when clicking on post thumbnail images

Post Scroller
- post_type (optional) – Default ‘post’
- post: Default post
- u_event (custom post type)
- u_course (custom post type)
- count (optional) – Default 4
- order (optional) – Default DESC (ASC|DESC)
- orderby (optional) – Default DATE
- 'none' - No order
- 'ID' - Order by post id. Note the captialization.
- 'author' - Order by author.
- 'title' - Order by title.
- 'name' - Order by post name (post slug).
- 'date' - Order by date.
- 'modified' - Order by last modified date.
- 'parent'- Order by post/page parent id.
- 'rand' - Random order.
- 'comment_count' - Order by number of comments
- 'menu_order'- Order by Page Order. Used most often for Pages (Order field in the Edit Page Attributes box) and for Attachments (the integer fields in the Insert / Upload Media Gallery dialog), but could be used for any post type with distinct 'menu_order' values (they all default to 0).
- 'meta_value' - Note that a 'meta_key=keyname' must also be present in the query. Note also that the sorting will be alphabetical which is fine for strings (i.e. words), but can be unexpected for numbers (e.g. 1, 3, 34, 4, 56, 6, etc, rather than 1, 3, 4, 6, 34, 56 as you might naturally expect). Use 'meta_value_num' instead for numeric values.
- 'meta_value_num' - Order by numeric meta value (available with Version 2.8). Also note that a 'meta_key=keyname' must also be present in the query. This value allows for numerical sorting as noted above in 'meta_value'.
- 'post__in'- Preserve post ID order given in the post__in array
- meta_key (Optional) ame of meta key for ordering
- link_text (optional) – Label of more link. If not set, “More” button is not shown
- link_url (optional) – URL of more link
- cat (optional): ID or slug of categories. Separated by a comma. Ex. 1,2,3,4
- tag (optional): Tags list. Separated by a comma. Ex. Tag1, tag2, tag3
- ids (optional): IDs of posts. Separated by a comma. Ex. 1, 2, 3, 4

Post Carousel
- post_type (optional) – default ‘post’
- post: default post
- u_event (custom post type)
- u_course (custom post type)
- cat (optional): ID or slug of categories. Separated by a comma. Ex. 1,2,3,4
- tag (optional): tags list. Separated by a comma. Ex. Tag1, tag2, tag3
- ids (optional): IDs of posts. Separated by a comma. Ex. 1, 2, 3, 4
- count (optional) – Default 4
- visible (optional): Number of visible items. Default: 4
- order (optional) – Default DESC (ASC|DESC)
- orderby (optional) – Default DATE
- 'none'- No order
- 'ID' - Order by post id. Note the captialization.
- 'author' - Order by author.
- 'title' - Order by title.
- 'name' - Order by post name (post slug).
- 'date' - Order by date.
- 'modified' - Order by last modified date.
- 'parent' - Order by post/page parent id.
- 'rand' - Random order.
- 'comment_count' - Order by number of comments
- 'menu_order' - Order by Page Order. Used most often for Pages (Order field in the Edit Page Attributes box) and for Attachments (the integer fields in the Insert / Upload Media Gallery dialog), but could be used for any post type with distinct 'menu_order' values (they all default to 0).
- 'meta_value' - Note that a 'meta_key=keyname' must also be present in the query. Note also that the sorting will be alphabetical which is fine for strings (i.e. words), but can be unexpected for numbers (e.g. 1, 3, 34, 4, 56, 6, etc, rather than 1, 3, 4, 6, 34, 56 as you might naturally expect). Use 'meta_value_num' instead for numeric values.
- 'meta_value_num' - Order by numeric meta value (available with Version 2.8). Also note that a 'meta_key=keyname' must also be present in the query. This value allows for numerical sorting as noted above in 'meta_value'.
- 'post__in' - Preserve post ID order given in the post__in array
- 'Start date, Upcoming Event or Course' - Display the upcoming Events/Course based on Start Date. Arranged by chronological order of the upcoming events/courses
- 'Start date, Recent Event or Course' - Display the recent Events/Course based on Start Date. Arranged by chronological order of the recent events/courses
- meta_key (optional): Name of meta key for ordering
- show_date (optional): Show date info. With standard posts, this is Published Date. With Event and Course, this is Start Date
- show_price (optional): Show price info. Only works with Event post type
- show_venue (optional): Show venue info. Only works with Event & Course post type
- show_time (optional): Show start time. Only works with Event & Course post type

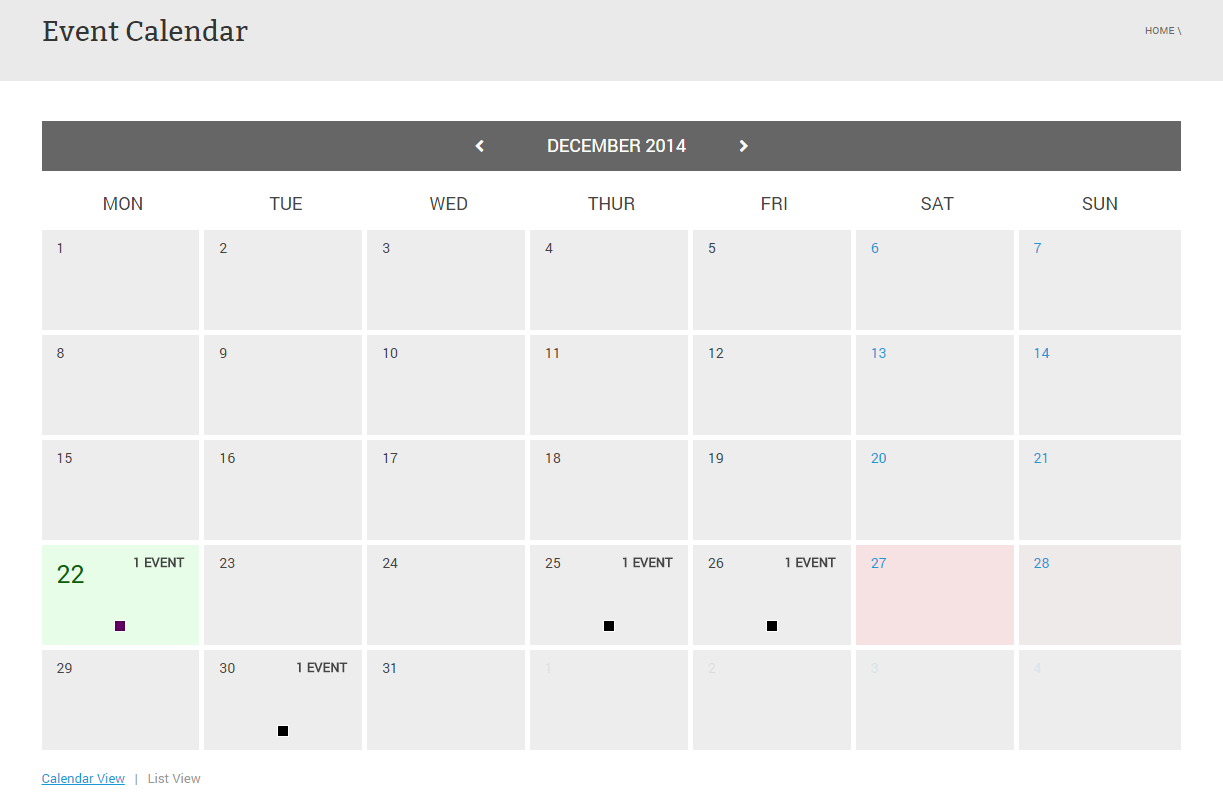
Calendar
- post_type: Choose between u_event (to display Events) or u_course (to display Courses)
- month: Default month to display events. By default, the calendar displays current month of current year
- year: Default year to display events. By default, the calendar displays current month of current year
- tag: Enter Event Tags to filter events, separated by a comma. For example: "tag-1, tag-2"
- cat: Enter Event Category to filter events, separated by a comma. For example: "cat-1, cat-2"
- exclude: If you want to hide specific events, enter Event ID List here. For example: "1, 2, 3"
- ignore (select): Choose between "recent" (hide expired events) or "upcoming" (hide upcoming events)
Heading
- url: Enter URL link to navigate

University Button
- link- Enter URL of link
- icon (optional) – Name of FontAwesome icon (without “fa-”)
- target - Open link in New Tab or Curent Tab
- size (optional) – Default value “small”
- small
- big
- solid (optional) – Default value “0/false” – Solid background or not
- 0/false
- 1/true: Border and background color have same color
- has_arrow (optional) – Default value “1/true”
- 1/true
- 0/false
- color (optional) – Only works with solid button (default theme color)
- css_animation - Select types of animation for element to be animated when it "enters" the browsers viewport (Note: works only in modern browsers), with options: top-to-bottom, bottom-to-top, left-to-right, right-to-left, appear-from-center

TextBox
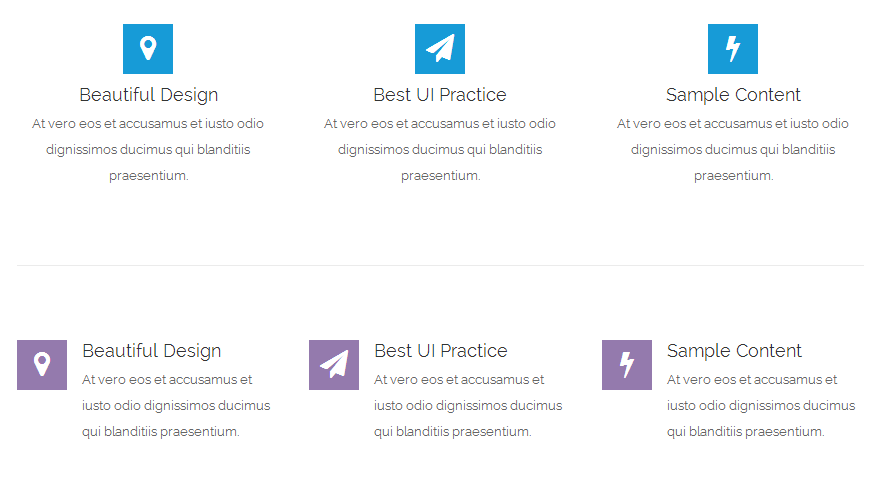
- icon (optional) – FontAwesome Icon (without “fa-“)
- link - Open Link in New tab or Curent tab
- heading (optional) – Heading text
- layout (optional) – Default “left”
- left: Icon floats left, text align left
- center: Icon is center, text align center
- right: Icon floats right, text align right
- schema (optional) – Default “light”
- light: Light color
- dark: Dark color
- icon_background_color – Default #fff (“dark” schema) and #343434 (“light” schema)
- #RGB
- icon_background_hover – Default theme color – background color of icon when mouse-hovered
- #RGB
- heading_color – Default #fff (“dark” schema) and #343434 (“light” schema)
- #RGB
- content_color – Default #FFF, opacity 50% (“dark” schema) and #343434, opacity 50% (“light” schema)
- #RGB
- css_animation - Select types of animation for element to be animated when it "enters" the browsers viewport (Note: works only in modern browsers), with options: top-to-bottom, bottom-to-top, left-to-right, right-to-left, appear-from-center
Blog
- post_type (optional) – Default ‘post’
- post: Default post
- u_event (custom post type)
- u_course (custom post type)
- count (optional) – Default 4
- order (optional) – Default DESC
- ASC|DESC
- orderby (optional) – Default DATE
- 'none' - No order
- 'ID' - Order by post ID. Note the captialization.
- 'author' - Order by author.
- 'title' - Order by title.
- 'name' - Order by post name (post slug).
- 'date' - Order by date.
- 'modified' - Order by last modified date.
- 'parent' - Order by post/page parent ID.
- 'rand' - Random order.
- 'comment_count' - Order by the number of comments
- 'menu_order' - Order by Page Order. Used most often for Pages (Order field in the Edit Page Attributes box) and for Attachments (the integer fields in the Insert / Upload Media Gallery dialog), but could be used for any post type with distinct 'menu_order' values (they all default to 0).
- 'meta_value' - Note that a 'meta_key=keyname' must also be present in the query. Note also that the sorting will be alphabetical which is fine for strings (i.e. words), but can be unexpected for numbers (e.g. 1, 3, 34, 4, 56, 6, etc, rather than 1, 3, 4, 6, 34, 56 as you might naturally expect). Use 'meta_value_num' instead for numeric values.
- 'meta_value_num' - Order by numeric meta value (available with Version 2.8). Also note that a 'meta_key=keyname' must also be present in the query. This value allows for numerical sorting as noted above in 'meta_value'.
- 'post__in' - Preserve post ID order given in the post__in array
- meta_key (optional)
- name of meta key for ordering
- show_date (optional) – Default 1/true - Show or hide published date (for post) or start-date (for course, event)
- 1/true
- 0/false
- show_price (optional) – Default 0/false - Show or hide price (for course, event)
- 0/false
- 1/true
- more_text (optional) – Default “Visit Blog”
- If it is not set, this button will not be shown
- more_link (optional) – Default link to archive pages of post types
- detail_text (optional) – Default “Details”
- If it is not set, this button will not be shown
- show_comment_count (optional) – Default “1/true”
- 1/true
- 0/false
- column (optional) – Default “1/true” – 2 columns or 1 column
- 1/true
- 0/false
- css_animation - Select types of animation for element to be animated when it "enters" the browsers viewport (Note: works only in modern browsers), with options: top-to-bottom, bottom-to-top, left-to-right, right-to-left, appear-from-center
- cat (optional) - List of cat ID (or slug), separated by a comma
- tag (optional) - List of tags, separated by a comma
- ids (optional) - List of post ids, separated by a comma. If this param is presented, "cats" and "tags" params are useless

Blockquote
Dropcaps
It is often used at the beginning of each article with large font and highlighted color
 on formatting toolbar > Choose Dropcap
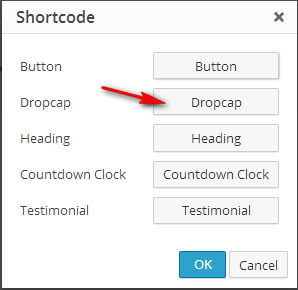
- [dropcap] & [/dropcap] is a start & end tag
- Dropcap text here: Enter the characters which you want to create large letter at the beginning of the line

Countdown
- year, month, day, hour, minute - Time to count down. If hour and minute is not present, default value is 00:00
- number
- show_second - Show countdown for seconds. Default is 1/true
- 1/true - 0/false
- bg_color - Color of background. Default theme color
- #RGB
- num_color - Color of number. Default white (#FFF)
- #RGB
- css_animation - Select types of animation for element to be animated when it "enters" the browsers viewport (Note: works only in modern browsers), with options: top-to-bottom, bottom-to-top, left-to-right, right-to-left, appear-from-center

Testimonials
- scroll - auto scroll the testimonial slideshow or not - default is 0/false (0/false - 1/true)
- name - Name of person
- text
- title - Title of person
- text
- avatar - ID of image
- text

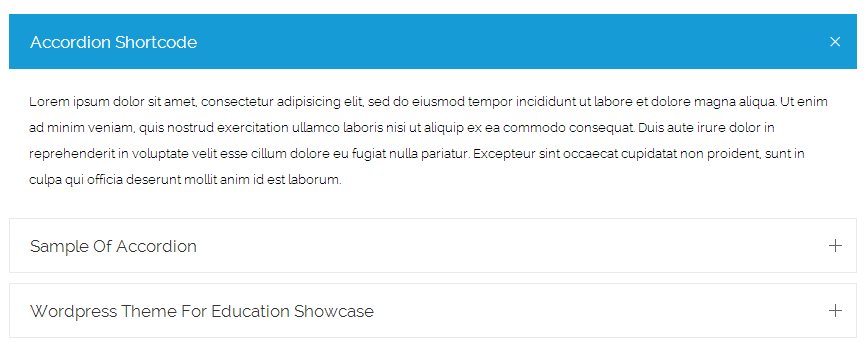
Accordion
Tab

Tour Section

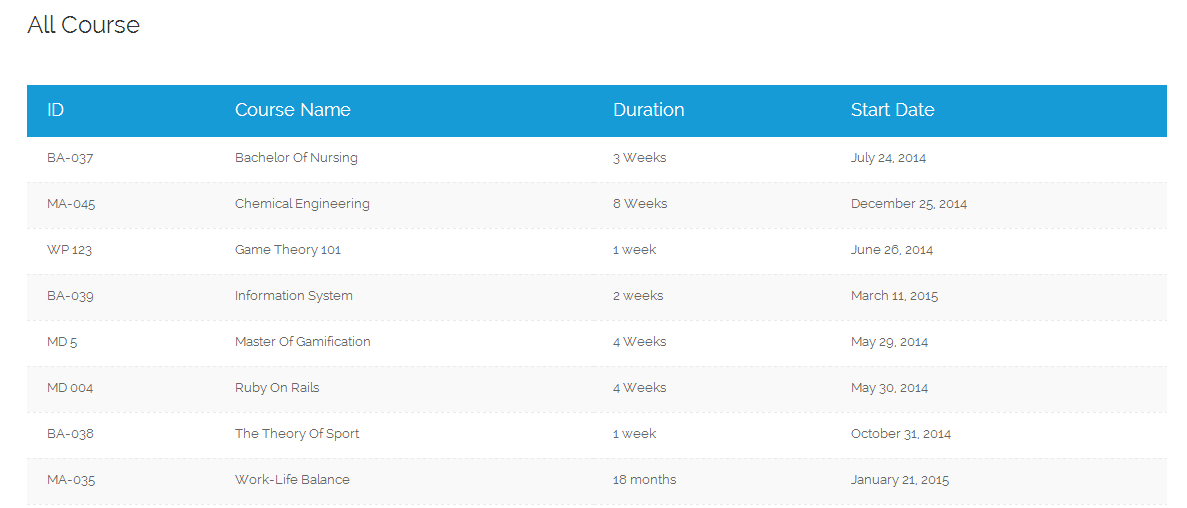
Course List Table
- cat - ID or slug of course category
- ids - List of post IDs, separated by a comma. If this param is presented, "cats" params are useless
- count - Number of items
- order - Select ASC or DESC
- orderby - For options
- date: Order by publish date
- meta_value_num: Order by Start date
- upcoming: Order by start date - upcoming course
- title: Order by title
Responsive Google Adsense
This shortcode displays Google Adsense banner, which requires you to have a Google Adsense account. The ads is responsive, which means it will automatically change from a squared banner into a vertical banner in different screen size
- pub (required) - Google Adsense Publisher ID
- slot (required) - Google Adsense Slot ID
- class - Custom CSS Class
Compare Table
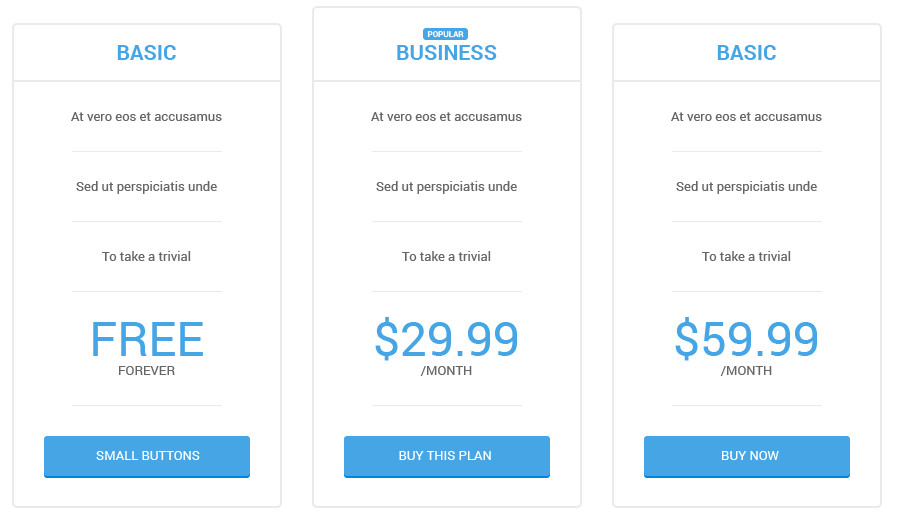
- [comparetable]
- class (text) - Custom CSS class
- id (text) - Custom ID. If it is not provided, random ID will be generated
- color (hexa color) - Main color of compare table
- [c_column]
- class (text) - Custom CSS class. Use "recommended" class to turn this column into special one
- column (number) - Number of columns in this compare table. It should match number of [c-columns] shortcode within [comparetable]
- color (hexa color) - Text color of column
- bg_color (hexa color) - Background color of column
- title (text) - Title of column
- recommended_text (text) - Text that appears in a recommended column
- [price]
- price (number) - Price value. Can be text (ex: FREE)
- price_text (text) - Additional text after price value, ex: "per MONTH"
- currency (text) - Currency symbol, ex: "$"

Video Link

- image (text) - ID of image (attachment) or URL of image
- style (select) - Select style for the banner
- boxed - Width and Height properties are used
- fullwidth - Width is 100% and Height property is used
- width (number) - Width of banner in pixels, only work with "boxed" style
- height (number) - Height of banner in pixels
- text (text) - Text that appears on banner
- opacity (number) - Value of opacity layer, from 0 to 0.99
- video_url (URL) - URL of the video
- parallax (true/false) - Enable parallax effect
- target (select) - Action when clicking on banner
- popup - Open a popup video
- current - Open link in current tab
- blank - Open link in new tab
LearnDash Lecturers
To list lecturers (U-Member) of a LearnDash course.

To add lecturers to a LearnDash Course, go to edit that course and choose from U-Members list

- id - optional - ID of LearnDash Course. If ID is empty, current viewing LearnDash course will be used
U-Course plugin
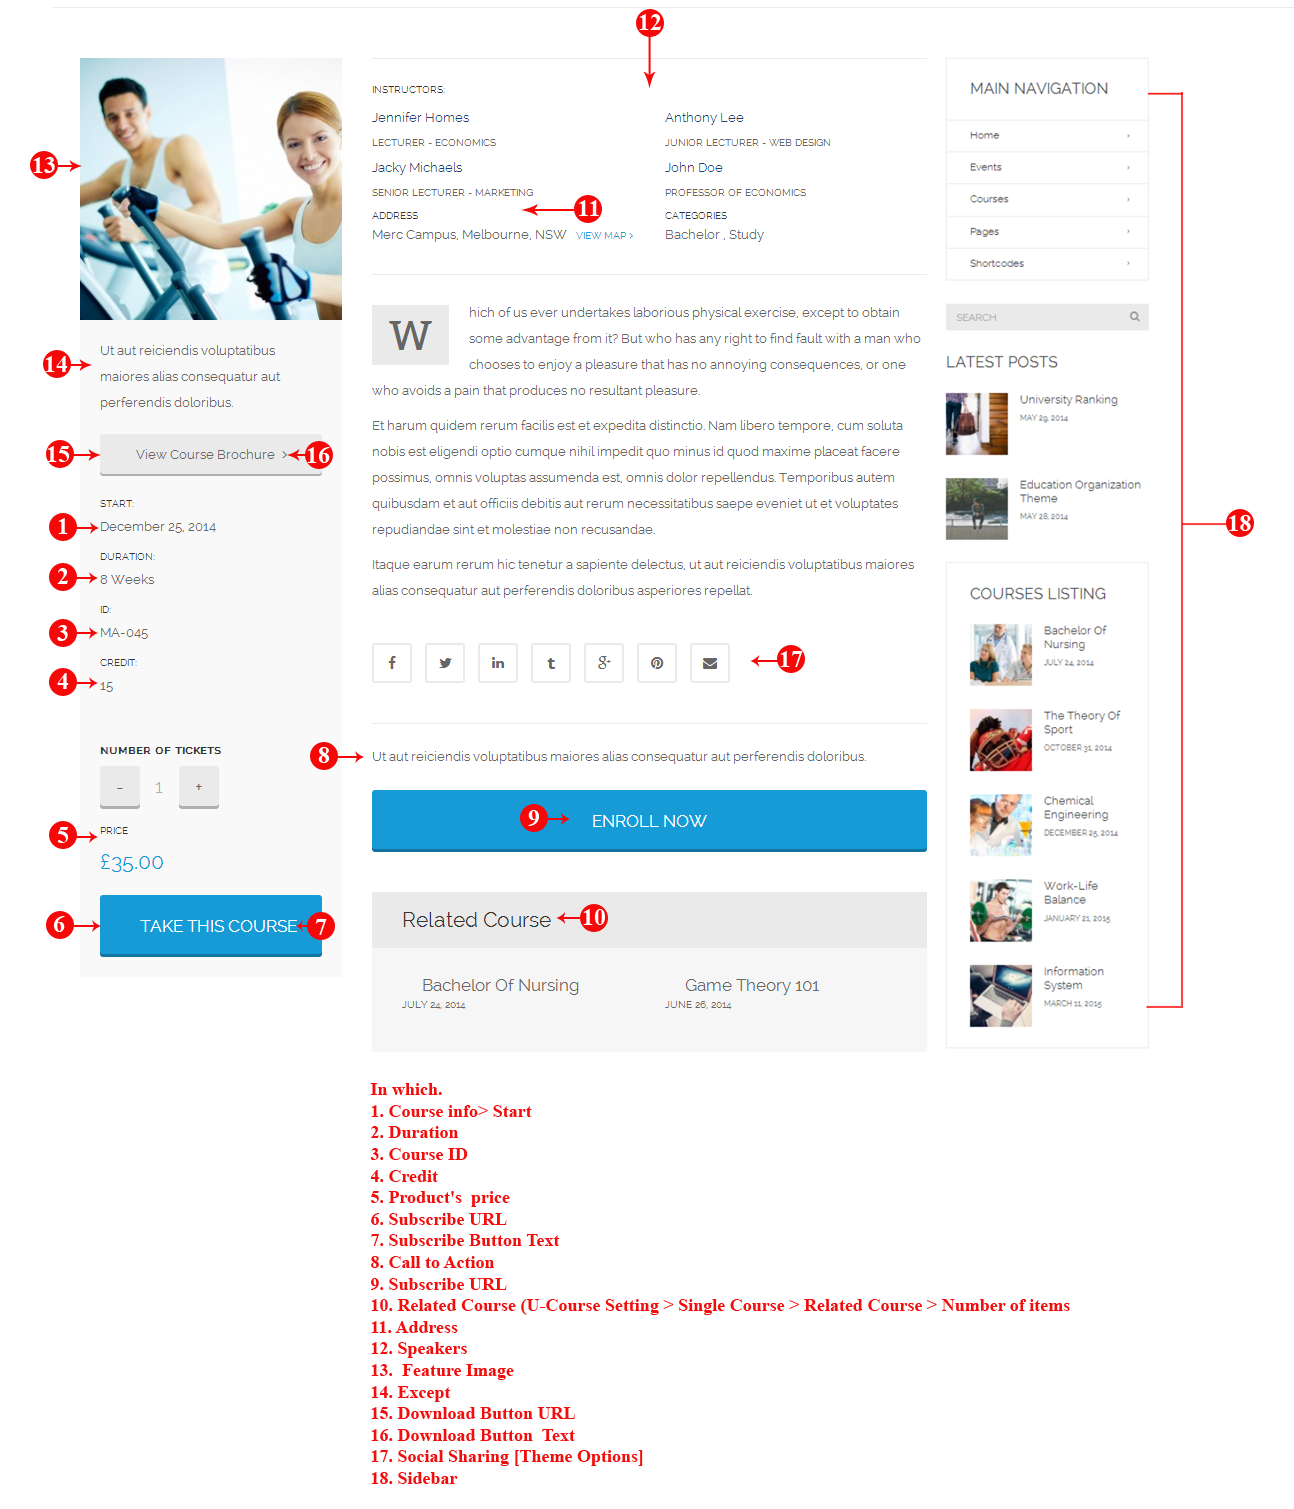
If you want to have Course custom post type, install u-course plugin. The installation file can be found in the /Installation Files/ folder of the download package. After installed, you will see U-Course and U-Course Settings menu items in the left menu panel.
Create a Course
- Go to U-Course > Add New Course
- Enter course title, description and other information

- Layout settings
Sidebar Select "Default" to use settings in U-Course Settings page. If you do not choose “Default”, page will be formatted with “Left” sidebar , “Right” sidebar or no sidebar (“Hidden“) Content padding Enable default top and bottom margin - Course information
Start Date Course start date Course ID Course’s ID. It should be unique Product Select a WooCommerce product to sell this course. It requires WooCommerce plugin to be installed and there are some products to choose. See WooCommerce section to learn more about creating products. Address Location Address of course Duration Course duration information. For example: one week, two weeks Speakers Choose from members. It requires U-Member plugin to be installed and there are some members to choose. See U-Member plugin to learn more about managing members Credit Enter the number of credits need to learn in the registration course Subscribe URL Create a link to a subscribe form. If it is empty, button is invisible Subscribe Button Text Text that appears on the subscribe button Download Button URL Enter URL which allows user to download course’s document, If it is empty, button is invisible Download Button Text The name of button “download” (Text that appears on download button) Call to Action Text that appears before Subscribe Button - Excerpt: The brief introduction about course
- Layout settings
- U-Course supports categories (U-Course Categories)
U-Course settings page
Go to U-Course Settings from menu in the left- General
- Courses slug: Change course's slug. Remember to save the permalink settings again in Settings > Permalinks. By default, a course will have URL like this http://yourdomain.com/course/a-single-course-slug. If you enter program here, URL of course will be like this http://yourdomain.com/program/a-single-course-slug.
In addition, the courses listing page will be http://yourdomain.com/program instead of http://yourdomain.com/course - Course Categories Slug: Change course categories slug. Remember to save the permalink settings again in Settings > Permalinks
- Posts Per Page: Number of courses per page (in Courses Listing page). If not set, it is the value set in Settings > Reading > Blog pages show at most
- Filter bar: Enable filter bar
- Course Listing Order: Select one of three options for sorting according
- Upcoming: Course listing order by upcoming
- Start Date: Course listing order by start date (DESC)
- Modified Date: Course listing order by modified date(DESC)
- Course Listing Order Bar: Enable course listing order bar
- Show Price: Show Price of Course listing
- Courses slug: Change course's slug. Remember to save the permalink settings again in Settings > Permalinks. By default, a course will have URL like this http://yourdomain.com/course/a-single-course-slug. If you enter program here, URL of course will be like this http://yourdomain.com/program/a-single-course-slug.
- Single Course
- Sidebar: Choose default layout for Single Course pages (Right, Left or Hidden-FullWidth). This setting can be overridden in each course
- Related Courses > Number of items: Enter number of Courses displayed in the Related Courses section (in a Single Course page)
- Sidebar: Choose default layout for Single Course pages (Right, Left or Hidden-FullWidth). This setting can be overridden in each course
Courses Listing page
URL of Courses Listing page will be defined in U-Course Settings > General > Courses slug. By default, the Courses Listing page will be http://yourdomain.com/course. Changing the value of Courses slug will change the URL of Courses Listing page accordingly.So to create a menu item that link to Courses Listing page, use a Links menu item and enter URL of Courses Listing page into URL textfield
Selling a Course
To sell an Course, WooCommerce plugin must be installed. See WooCommerce section for more information.- First, you create a product in WooCommerce
- Create/Edit an Course
- Search and choose a Product for that course
U-Event plugin
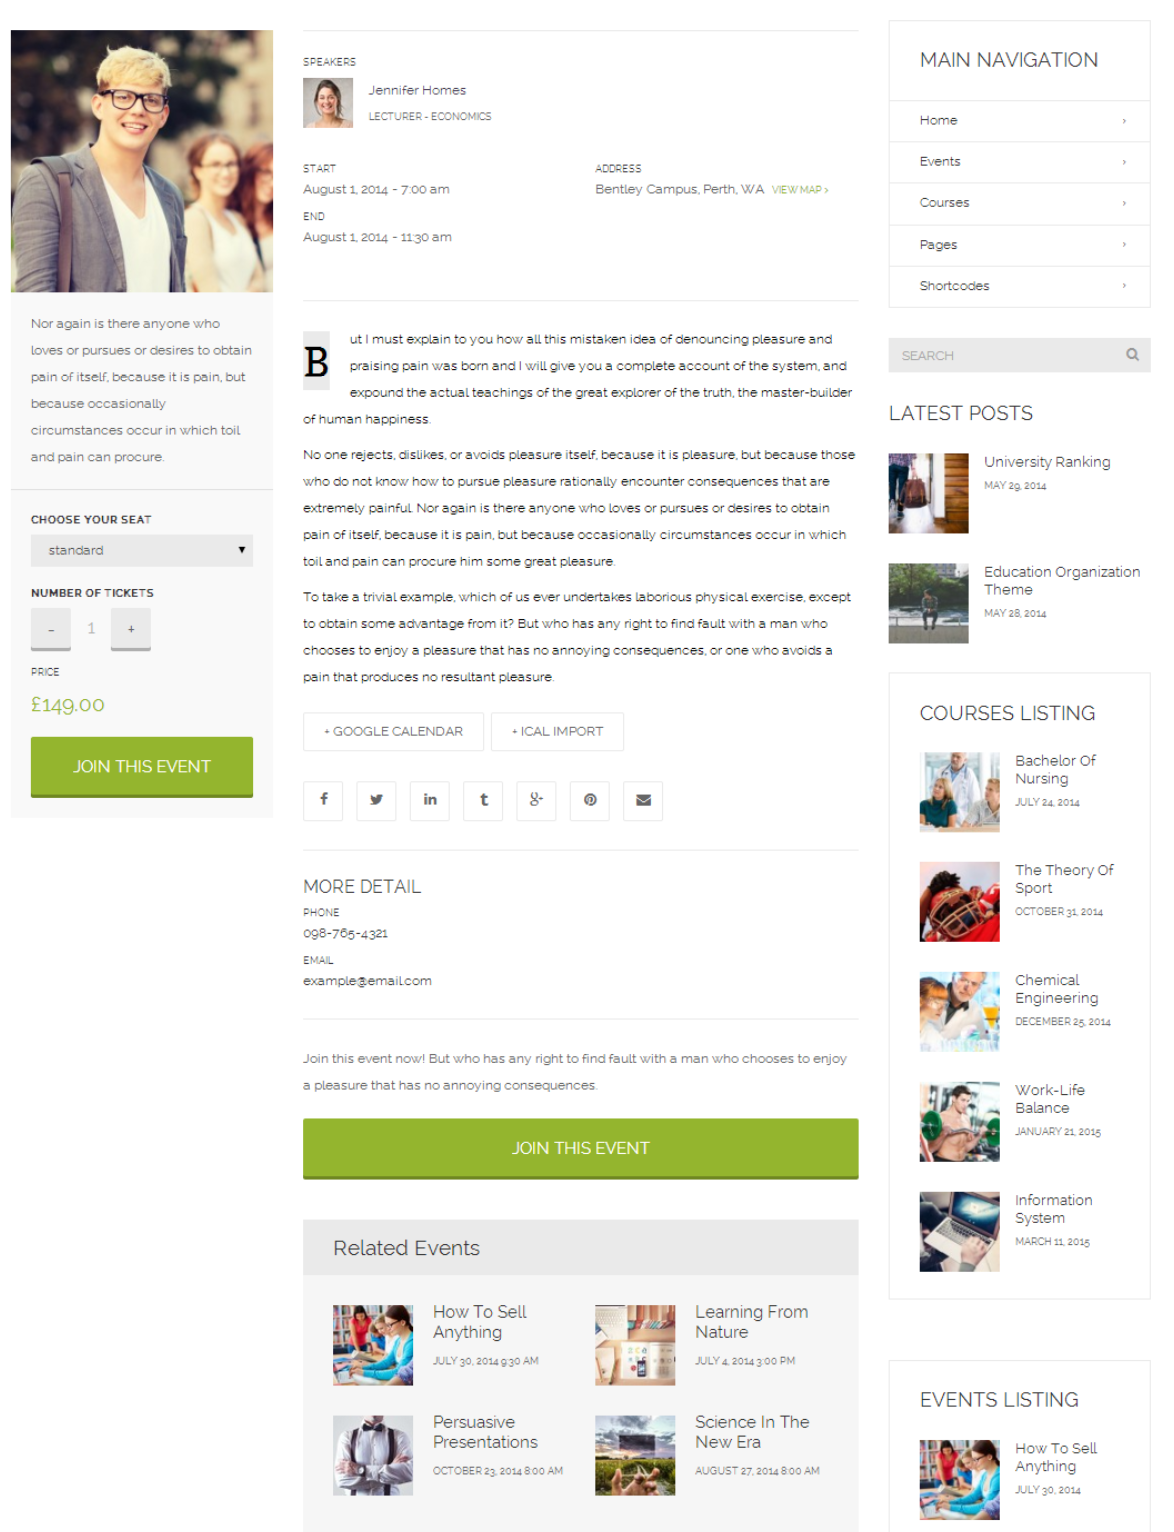
Create an Event
- Go to U-Course > Add New Event
- Enter event title, description and other information

- Layout settings
Sidebar Select "Default" to use settings in U-Course Settings page. If you do not choose “Default”, page will be formatted with “Left” sidebar , “Right” sidebar or no sidebar (“Hidden“) Content padding Enable default top and bottom margin - Event Info
Start Date Event Start Date & Time End date Event End Date & Time Event ID Event ID. It should be unique Product Select a WooCommerce product to sell this event. It requires WooCommerce plugin to be installed and there are some products to choose. See WooCommerce section to learn more about creating products. It is optional to link a product to an event. If you do not to use WooCommerce, just enter Subscribe URL for visitors to subscribe the events Speakers Choose from members. It requires U-Member plugin to be installed and there are some members to choose. See U-Member plugin to learn more about managing members Call to action Text that appears before Subscribe Button Subscribe URL Link to a subscribe form. Only work if no product is set. Subscribe Button Text Text that appears on the subscribe button - Event Location
Address Enter Location Address of event Phone Enter Contact Number of event Website Enter Website URL of event Email Enter Email Contact of event - Excerpt
The brief introduction about event
- Layout settings
- U-Event supports tags (U-Event Tags) and categories (U-Event Categories)
U-Event Settings Page
Go to U-Event Settings on the left of menu- General
- Events Slug: Change event's slug. Remember to save the permalink settings again in Settings > Permalinks. By default, an event will have URL like this http://yourdomain.com/event/a-single-event-slug. If you enter program here, URL of event will be like this http://yourdomain.com/program/a-single-event-slug.
In addition, the events listing page will be http://yourdomain.com/program instead of http://yourdomain.com/event - Listing Style: Select style for Events Listing page. It can be either "Classic" or "Grid"
- Posts Per Page: The number of events per page (in Events Listing page). If it is not set, it is the value set in Settings > Reading > Blog Pages Show At Most
- Filter bar: Enable ON or OFF filter bar
- Event Listing Order: Select one of three options for sorting according
- Upcoming: Event listing order by upcoming
- Start Date: Event listing order by start date (DESC)
- Modified Date: Event listing order by modified date(DESC)
Note: The above selection is used for both Event Listing and Event's Category Listing page - Event Listing Order Bar: Enable or Disable to display the box, select one of three options for sorting according to Upcoming | Start Date | Modified Date in event listing page
- Events Slug: Change event's slug. Remember to save the permalink settings again in Settings > Permalinks. By default, an event will have URL like this http://yourdomain.com/event/a-single-event-slug. If you enter program here, URL of event will be like this http://yourdomain.com/program/a-single-event-slug.
- Single Event
- Sidebar Choose default layout for Single Event pages (Right, Left or Hidden-FullWidth). This setting can be overridden in each event
-
Header Style: Choose default style for header of Single Event pages (Right, Left or Hidden-FullWidth). This setting can be overridden in each event
- Related Events > Related by: Get related events by same categories or same tags
- Related Events > Number of items: Enter the number of Events displayed in the Related Events section (in a Single Event page)
- Categories: Enable to display Categories info (in a Single Event page)
- Tags: Enable to display Tags info (in a Single Event page)
- Sidebar Choose default layout for Single Event pages (Right, Left or Hidden-FullWidth). This setting can be overridden in each event
Events Listing page
URL of Events Listing page will be defined in U-Event Settings > General > Events Slug. By default, the Events Listing page will be http://yourdomain.com/event. Changing the value of Events slug will change the URL of Events Listing page accordingly.So to create a menu item that link to Events Listing page, use a Links menu item and enter URL of Events Listing page into URL textfield
Selling an Event
To sell an Event, WooCommerce plugin must be installed. See WooCommerce section for more information.- First, you create a product in WooCommerce
- Create/Edit an Event
- Search and choose a Product for that event
U-Member plugin
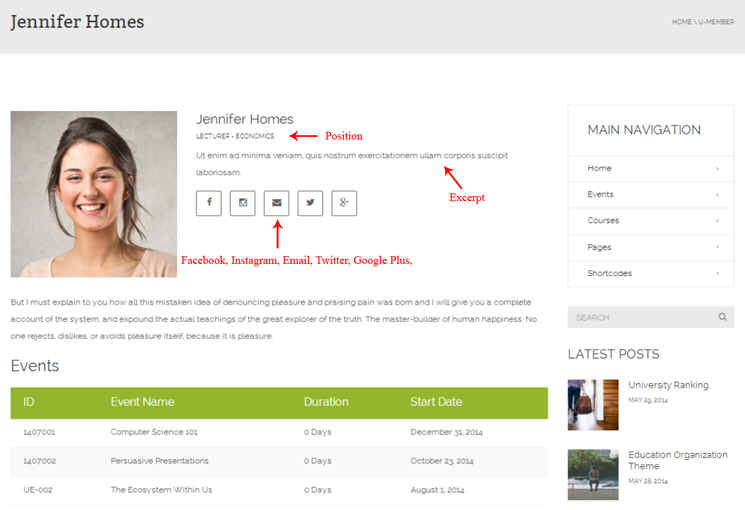
Add a Member
- Go to U-Member > Add New Member
- Enter Member Title, Description and other information

-
Layout settings
Sidebar Select "Default" to use settings in U-Member Settings page. If you do not choose “Default”, page will be formatted with “Left” sidebar , “Right” sidebar or no sidebar (“Hidden“) Content padding Enable default top and bottom margin -
Member Info
Position Position/Title of member Facebook Enter full link to member Facebook profile page Instagram Enter full link to member Instagram profile page Email Enter full link to member Email profile page Twitter Enter full link to member Twitter profile page LinkedIn Enter full link to member LinkedIn profile page Tumblr Enter full link to member Tumblr profile page Google Plus Enter full link to member Google Plus profile page Pinterest Enter full link to member Pinterest profile page YouTube Enter full link to member YouTube profile page Flickr Enter full link to member Flickr profile page GitHub Enter full link to member GitHub profile page Dribbble Enter full link to member Dribbble profile page - Excerpt: the brief introduction about Member
-
Layout settings
- U-Member supports Department (U-Department)
Member Setting Page
Go to U-Member Settings from menu in the left- General
Members Slug Change member's slug. Remember to save the permalink settings again in Settings > Permalinks. By default, a member will have URL like this http://yourdomain.com/member/a-single-member-slug. If you enter speaker here, URL of member will be like this http://yourdomain.com/speaker/a-single-member-slug. In addition, the members listing page will be http://yourdomain.com/speaker instead of http://yourdomain.com/member Members Department Slug Change department's slug. Remember to save the permalink settings again in Settings > Permalinks Filter bar Enable ON/OFF filter bar Member Listing Order Members are allowed to sort by "Modified Date" (It means that it is the date when Member is edited- Newly edited Member will be shown at the first position in Member List) or by "Alphabetically" -
Single Member > Sidebar
Choose default layout for Single Member pages (Right, Left or Hidden-FullWidth). This setting can be overridden in each member
Members Listing page
URL of Members Listing page will be defined in U-Member Settings > General > Members Slug. By default, the Members Listing page will be http://yourdomain.com/member. Changing the value of Members slug will change the URL of Members Listing page accordingly.
So to create a menu item that link to Members Listing page, use a Links menu item and enter URL of Members Listing page into URL textfield
Members Shortcode
To list all members
Screenshot

The Code
Parameters
- ids - int/string - List of member IDs, separated by a comma
- col - int - Size of each item. Possible values are from 1 to 12. Make sure the total values of all items in one row is 12
- link - select - Set to "no" if you don't want to put link (to the single member page) on each item, or leave it empty
- department - string - (optional) List of IDs or Slugs of U-Department, separated by a comma. It is used to query members in a department
- count - int - number of items to display
- order - ASC/DESC - order items ascending or descending
- orderby - select - condition to order items. Please check https://codex.wordpress.org/Class_Reference/WP_Query for a list of orderby values
- meta_key - string - if orderby is meta_value or meta_value_num, this parameter specifies the name of the meta data
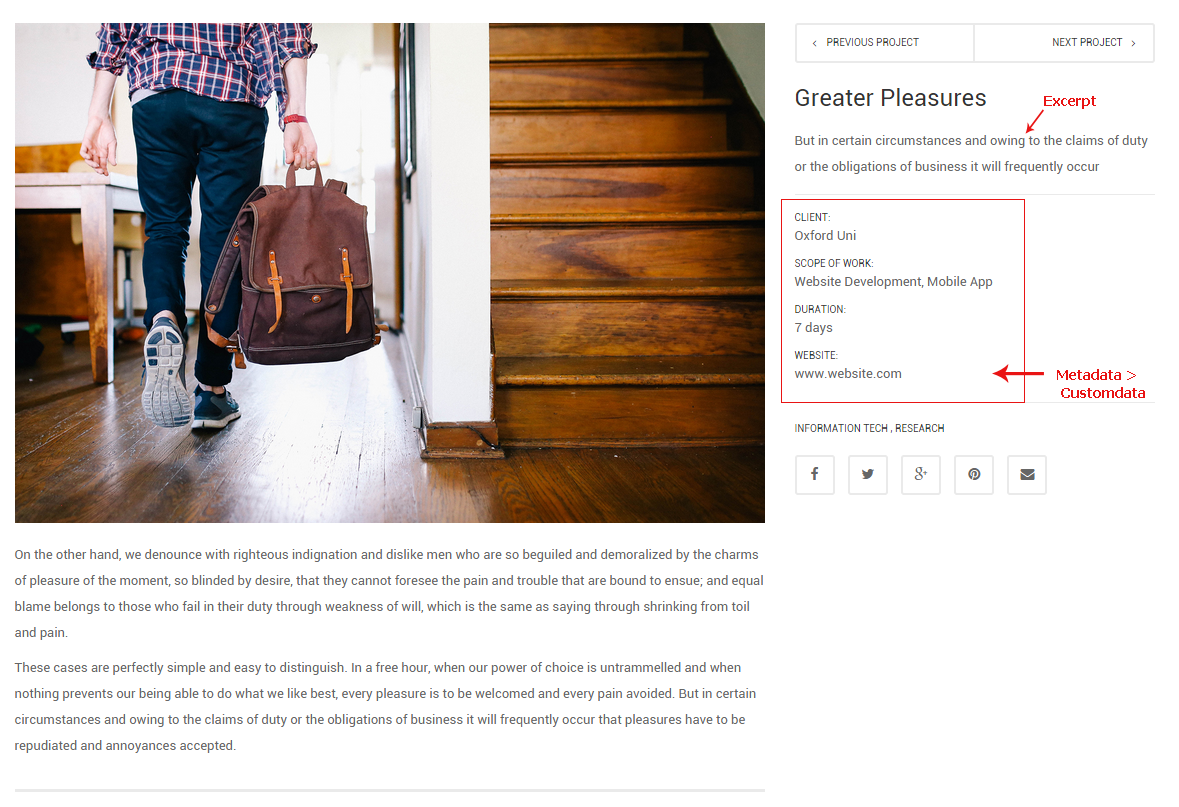
U-Project plugin
Add a Project
- Go to U-Project > Add New Project
- Enter Project Title, Description and other information

- Layout settings
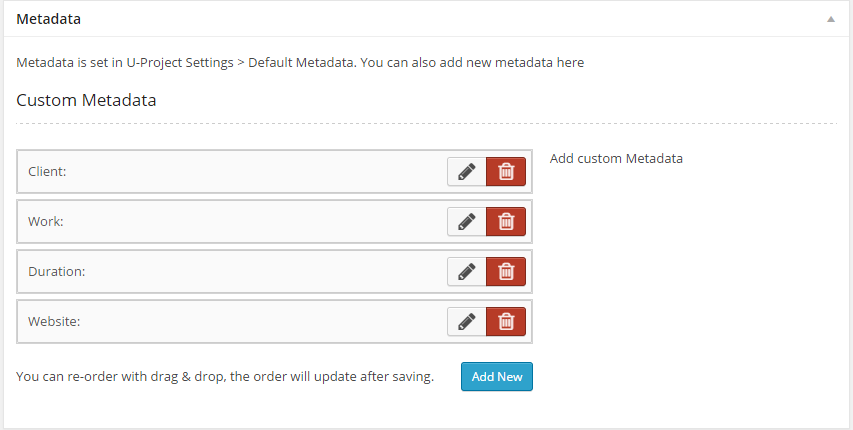
Sidebar Select "Default" to use settings in U-Project Settings page. If you do not choose “Default”, page will be formatted with “Left” sidebar , “Right” sidebar or no sidebar (“Hidden“) Content padding Enable default top and bottom margin - Metadata: Metadata is set in U-Project Settings > Default Metadata. You can also add new metadata here

- Excerpt: the brief introduction about Project
- Layout settings
- U-Project supports Categories (U-Project Categories)
Project Setting Page
Go to U-Project Settings from menu in the left- General > Project Slug
Change project slug. Remember to save the permalink settings again in Settings > Permalinks. By default, a project will have URL like this http://yourdomain.com/project/a-single-project-slug. If you enter for example enter is book here, URL of project will be like this http://yourdomain.com/book/a-single-project-slug.
In addition, the projects listing page will be http://yourdomain.com/book instead of http://yourdomain.com/project - General > Default Metadata
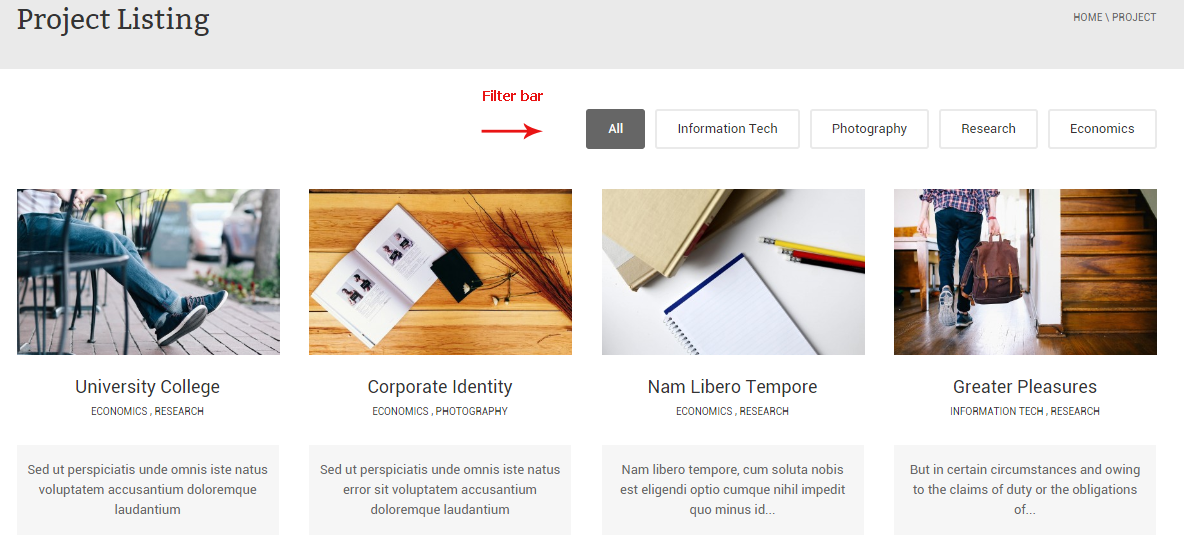
Define default metadata for all projects, ex: Client, Services... - General > Default Filter bar
Enable or Desable filter bar

-
Single Project > Sidebar
Choose default layout for Single Project pages (Right, Left or Hidden-FullWidth). This setting can be overridden in each project
-
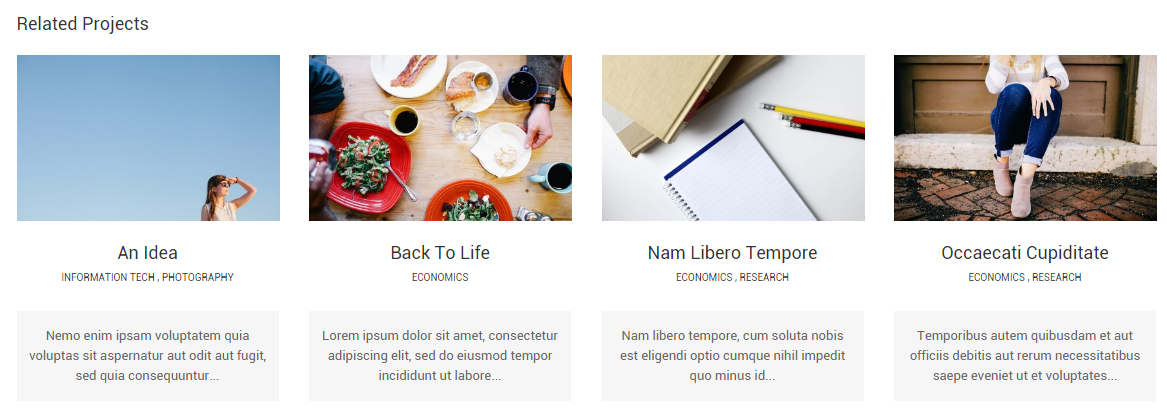
Single Project > Related Project (Related display in Project Single page)
Option display number of items in Related Project

-
Single Project > Project navigation
Choose which project to navigate when in a single project page
Projects Listing page
URL of Projects Listing page will be defined in U-Project Settings > General > Projects Slug. By default, the Projects Listing page will be http://yourdomain.com/project. Changing the value of Projects slug will change the URL of Projects Listing page accordingly.So to create a menu item that link to Project Listing page, use a Links menu item and enter URL of Projects Listing page into URL textfield
WooCommerce
Install WooCommerce
- Go to Plugins > Add New
- Type woocommerce in the search box and click "Search Plugins" or press Enter
- Install and activate the first result "WooCommerce - excelling eCommerce"
- Install WooCommerce Pages for the first time, click Install WooCommerce Pages

- Go to WooCommerce > Settings > Products > Product Listings > Product Archive / Shop Page: choose a page to appoint it to be a Shop page

Create a product
- Go to Product > Add Product
- Enter Product's title, description and other information
-
Layout settings
Sidebar Select "Default" to use settings in Theme Options page. If you do not choose “Default”, page will be formatted with “Left” sidebar , “Right” sidebar or no sidebar (“Hidden“) Content padding Enable default top and bottom padding for content (30px) - Product Data
Manage and configure Product. When the product is added, let's specify carefully types of product needing to be added here. There are two options to add the product- Simple product: the type of Simple product covers the vast majority of any products you may sell. Simple products are shipped and have no options. For settings in General:
- SKU – Used to track products. Must be unique and should be named so it does not clash with post ID’s.
- Price:
- Regular Price – The item’s main price.
- Sale Price – The item’s sale price.
- Variable product: Is the product that has different variations in each SKU (code). For example: a tshirt available in several different colors and/or sizes. Just need to set in:
- Attributes: Enter name Product and Value(s), then Save attributes
- Variations: After product is created in Attributes, then enter price for Values you have created in Attributes here
- Simple product: the type of Simple product covers the vast majority of any products you may sell. Simple products are shipped and have no options. For settings in General:
Pages & Posts
Layout Settings
- Sidebar : Select "Default" to use settings in Theme Options > Single Page for Pages or Theme Options > Single Post for Posts or Front page fullwidth
- Content Padding: Enable default top and bottom padding for content (30px)
Front Page Header Settings
Gallery Post
- Go to Posts > Add New
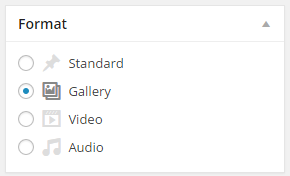
- Choose Gallery in Format

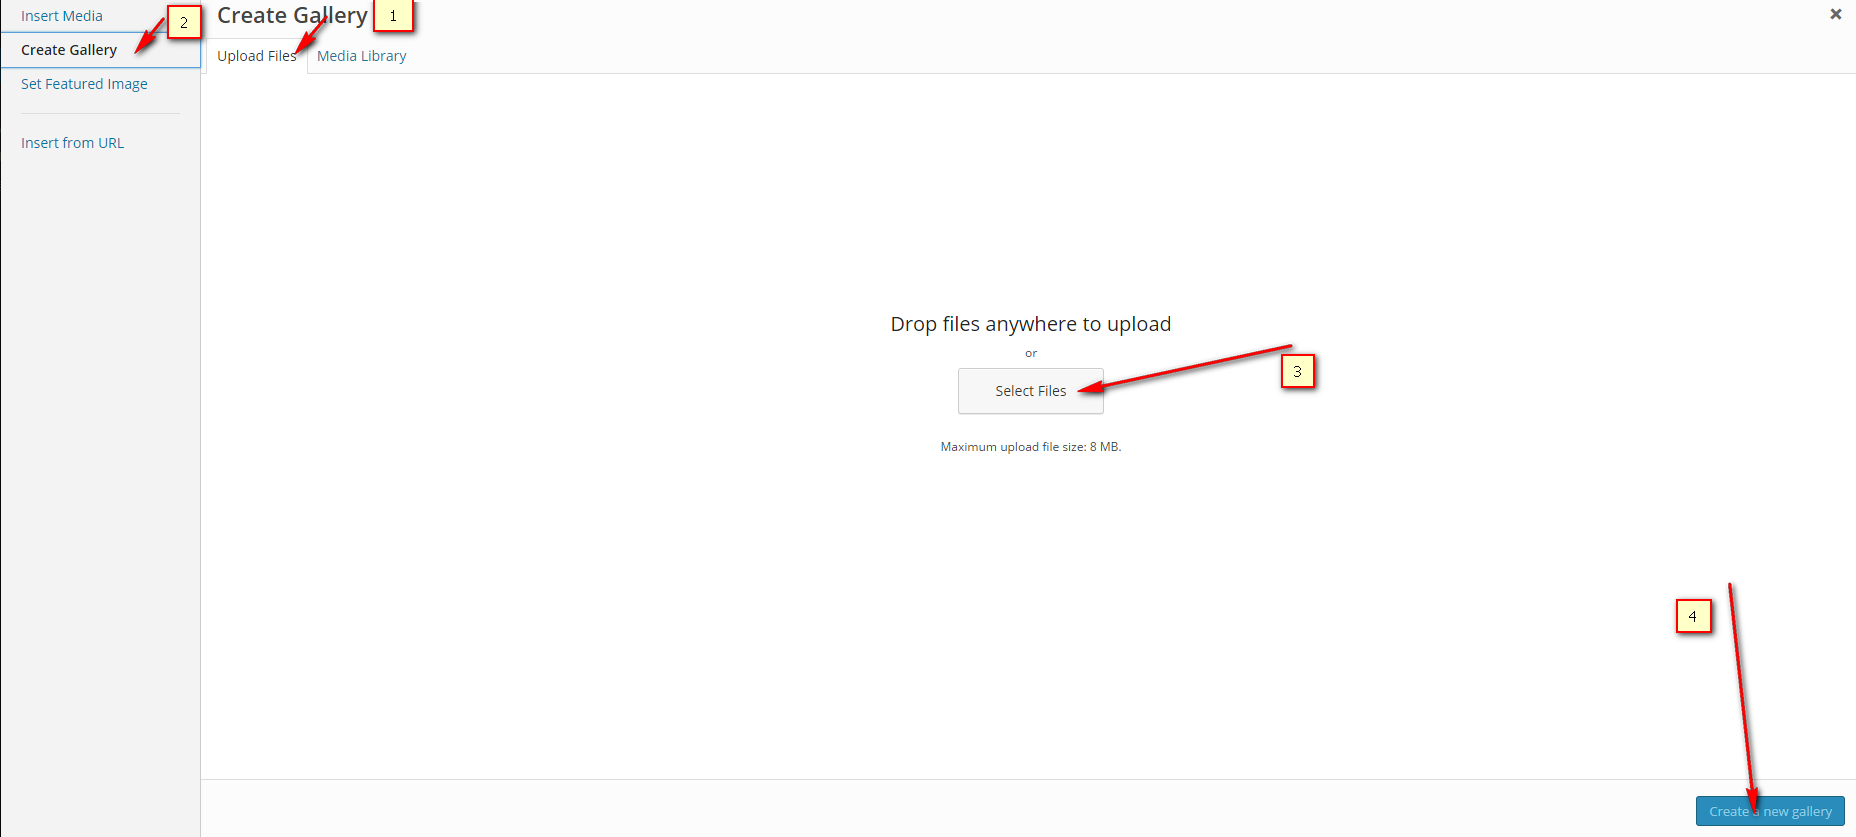
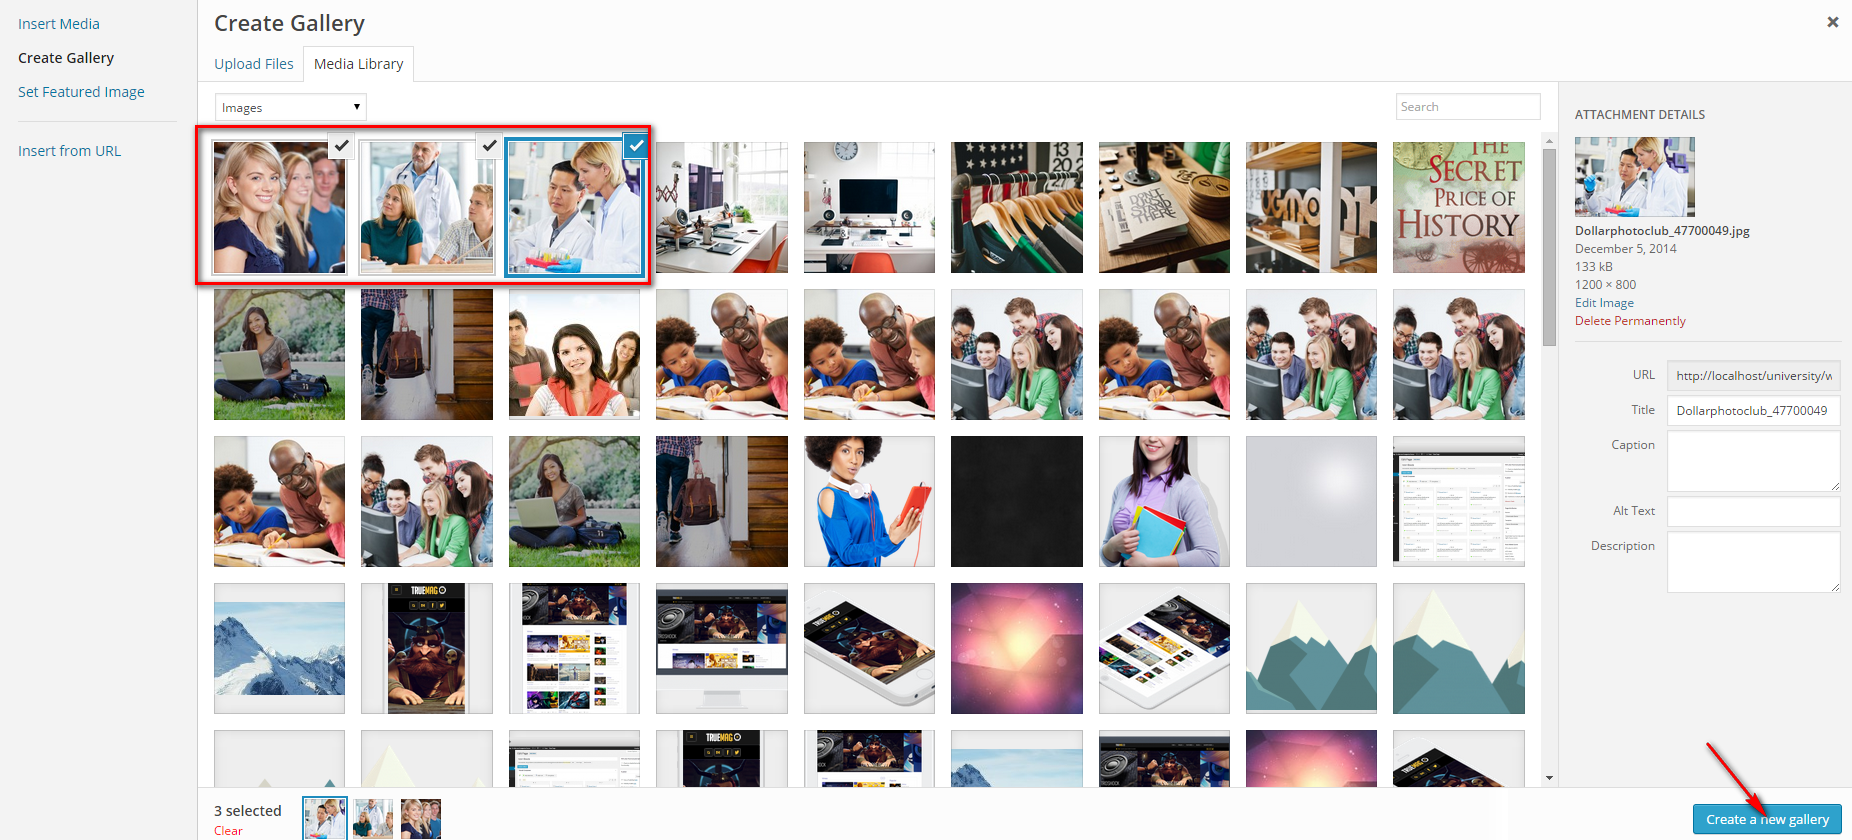
- Click Add Media > Create Gallery > Upload Files > Select files > choose image from your computer to upload and click Create a new gallery, continue uploading some images to create a Gallery album


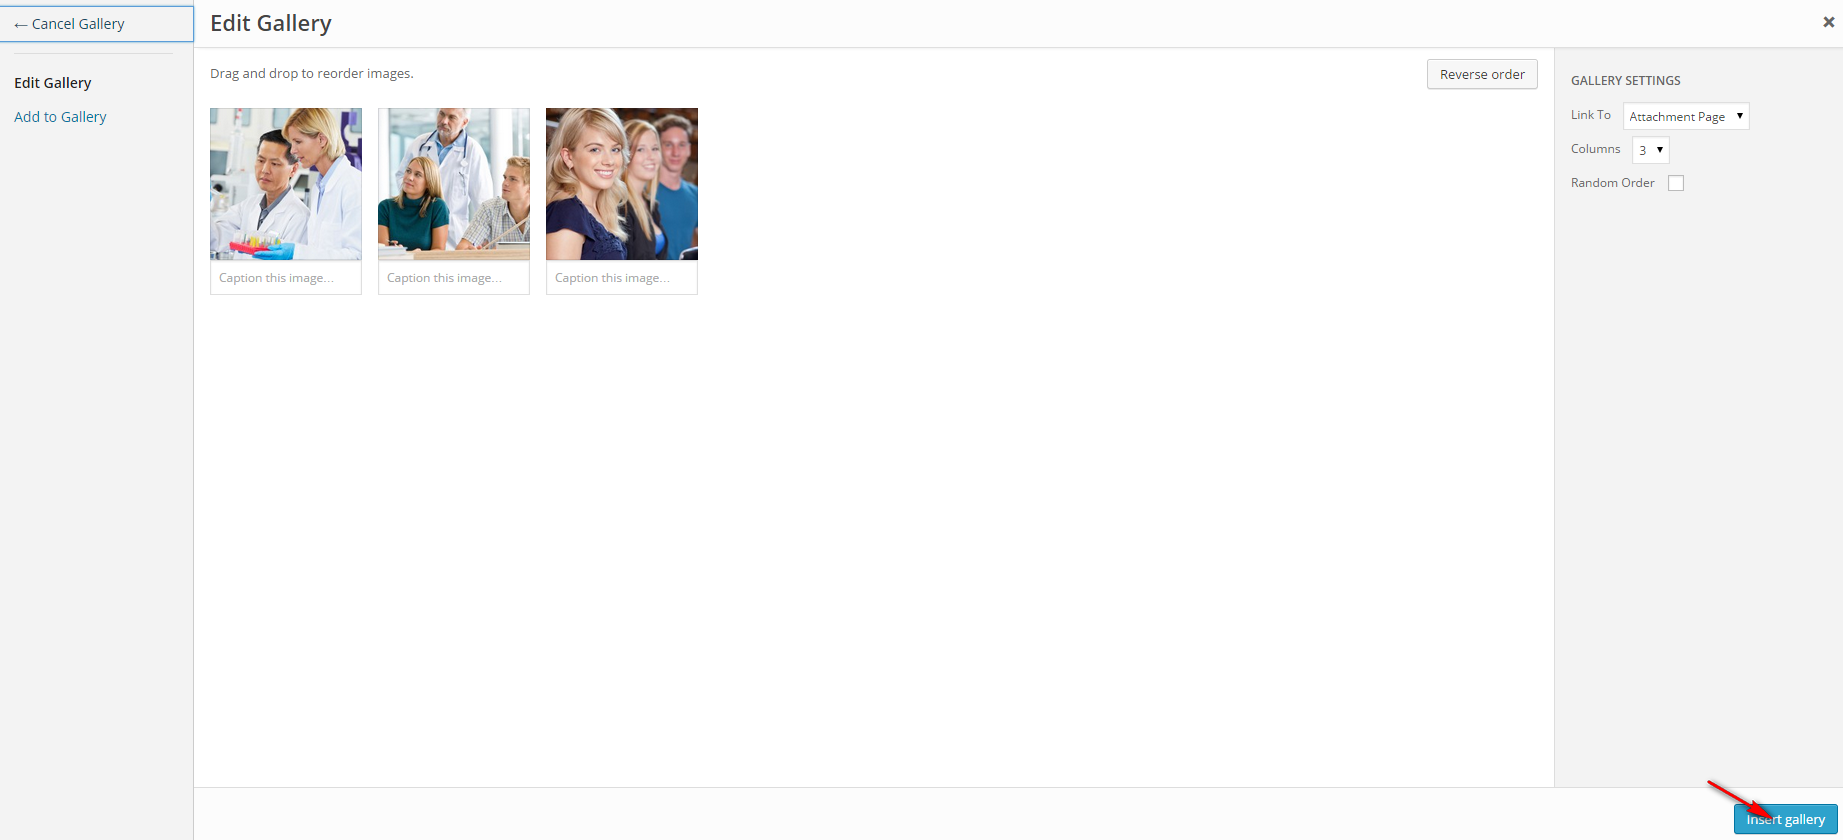
- Click Insert Gallery

- Enter necessary information such asTitle, Categories and tags,etc...then click Publish to save

RTL & Translation
- Download and install this tool POEdit
- Open POEdit and load [/university/languages/university.po]
- Translate the text and save the file
- A file named university.mo is created. Rename it with Code Name of your language. For example, de_DE.mo for German - Deutsche. See language code list here http://codex.wordpress.org/WordPress_in_Your_Language
- (For WordPress 3.x)Open [{wordpress root}/wp_config.php] and find this line define('WPLANG', '');. Change it with your language code, for example define('WPLANG', 'de_DE');
- (For WordPress 4.x) Go to Settings > General and change your site language
Using child theme
Translate Child Theme
- Add a languages directory in Child Theme
Something like: university-child/languages/
- Add language files.
Your filenames have to be de-DE.po and de-DE.mo (depending on your language)
- Add this code in university-child/functions.php file
Add .JS files to Child Theme
- Add a js directory in Child Theme
Something like: university-child/js/
- Add js files.
For example: university-child/js/cactus-themes.js
- Add the code segment with the structure as follows in university-child/functions.php file to load a Script from a Child Theme
Licenses
- BootStrap (Apache License v2.0) - http://twitter.github.io/bootstrap/
- Font Awesome (GPL License) by Dave Gandy - http://fontawesome.io
- The Final Countdown for jQuery (MIT License) by Edson Hilios (http://hilios.github.io/jQuery.countdown/)
- OwlCarousel (MIT License) by Bartosz Wojciechowski (http://www.owlgraphic.com/owlcarousel/)
- jQuery lightbox and modal window plugin (MIT License) by Jack Moore (http://www.jacklmoore.com/colorbox)
- OptionTree (GNU License) by Derek Herman (https://github.com/valendesigns/option-tree/)
- Fontastic (MIT License) - http://fontastic.me/
- Mobile Detect (MIT License) by Serban Ghita and Victor Stanciu - http://mobiledetect.net
- TGM-Plugin-Activation (GPL V2 License) by Thomas Griffin and Gary Jones - https://github.com/thomasgriffin/TGM-Plugin-Activation
- Envato Protected API by Derek Herman <[email protected]>
- WordPress Importer (GPL V2 License) by wordpressdotorg - http://wordpress.org/extend/plugins/wordpress-importer/
Support
If you face problems with the installation or customization of our product please do not hesitate to contact us via our support ticket system:

